1. Welcome to Tacoma World!

    You are currently viewing as a guest! To get full-access, you need to register for a FREE account.

    As a registered member, you’ll be able to:
    • Participate in all Tacoma discussion topics
    • Communicate privately with other Tacoma owners from around the world
    • Post your own photos in our Members Gallery
    • Access all special features of the site

Tacoma_Untamed The Never Ending Build

Discussion in '3rd Gen. Builds (2016-2023)' started by tacoma_untamed, Jun 25, 2020.

  1. Jun 25, 2020 at 2:05 PM
    #1
    tacoma_untamed

    tacoma_untamed [OP] Member

    Joined:
    May 15, 2019
    Member:
    #293389
    Messages:
    13
    Gender:
    Female
    Vehicle:
    2018 Tacoma TRD
    IG: tacoma_untamed

    Here's my attempt at documenting the build process. I’ve used Tacoma World as a resource for so many of the mods I’ve done and I hope to help or inspire at least one person.

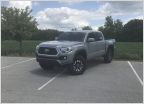
    Background: I purchased the truck new in June 2018 – TRD Off Road 4x4 Double Cab 5’ Bed. I had a ’00 Dodge Ram Single Cab (solid axle) before this. The dodge was an amazing truck but the single cab didn’t work all that well for my lifestyle. I wanted something to where I could take occasional passengers & 3 large dogs.

    IMG_20200603_161906_109.jpg

    IMG_20200603_191140_098.jpg
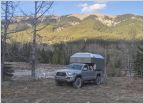
    Purpose: This truck is mostly a (frequent) weekend warrior with a few longer trips each year as the work schedule allows. I mostly drive and camp on moderate trails but occasionally will find myself on a more difficult trail & pushing limits. I’m always off the beaten path & the majority of the time I’ll be gone for 2-3 days without seeing another person. I would rather have all the features and not need them, then find myself stuck or broken in the middle of nowhere, often by myself, and with no cell reception. I travel with the 3 large dogs so the truck was built with them in mind! I’ve had to get very creative with storage & packing – more on this later.

    IMG_20200623_203512_271.jpg

    I always do only one mod at a time & then give it some time to test so I know how each change impacts the drive & functionality of the truck.

    CURRENT MODS

    SUSPENSION and related

    Front
    · King 2.5 Extended Mid-Travel Front Remote Reservoir Coilovers with Compression Adjusters (25001-119-A-EXT). Current coil spring is the King 650# 14”. (Previous coil spring was 600#)
    · SPC Adjustable Upper Control Arm*

    Rear
    · King 2.5 Rear Remote Reservoir with Compression Adjusters (25001-121-A)
    · Dakar Medium Duty Leaf Spring WITH an Add a Leaf (I added later)
    · WFO 10” Limit Straps
    · Wheelers SuperBump Bumpstop

    *The adjustable UCA is required for lift heights over 1” especially for off road use. These push the caster as far forward as possible to help clear oversized tires.

    ARMOR
    · RCI Rock Sliders with Top Tread Plate & 5 Degree Angle
    · RCI Full Skid Package (3/16” Steel)
    · ATH Fab High Clearance Rear Bumper with Tire Carrier - on order

    WHEELS/TIRES and related
    · 285/70/17 General Grabber ATx (CMC NEEDED)
    · 305NV Method Race Wheels 17 x 8.5/ 0mm Offset and 4.75” Backspacing

    CAMPER SHELL & BED SETUP
    · Snug Top Rebel with the following options:
    -LED Lighting
    -Sliding Side Windows & Pet Screens
    -Sliding Front Window/ Drop Down Front Window
    https://www.snugtop.com/product/reb...CoU6hazGRolNViY-zPlmWTttU6U6IU9EaArgvEALw_wcB
    · Bed Rug and Rubber Mat
    · Bed front header deck rail (ebay)
    · 4x4 Innovations Bed Rail Double Quick Fist Mount (for ax & shovel)
    · 2 Ammo Cans bolted to the bed rails for storage
    · D-Rings (extra tie down points)

    ROOF RACKS / STORAGE
    · Sherpa Equipment Company “Grand Teton” up front
    · Sherpa Equipment Company “Crows Nest” over the shell
    · Roam Adventure Co 95L Rugged Cases x2

    ELECTRICAL
    · Off Grid Engineering Dual Battery “Split System”
    · Odyssey Group 35 AGM batteries
    · Switch Pro SP-9100
    · Switch Pro Power Trays Engine Mount
    · 12v socket in truck bed – always live

    LIGHTS
    · Roof Rack Light Bar -ExtremeLED 44" X6S Slim Series Amber and White 210W Combo Beam LED Light Bar
    · Ditch Lights -Dark Defense DDS4 2.0 45W 4200 Lumen 3" Off-Road Pod Lights (Clear Spot Lens + the Amber Spot Lens)
    · Rear Bumper (same as ditch lights)

    RECOVERY
    · MAXTRAX Recovery Boards
    · MAXTRAX Mounting Pins- I purchased the mounting pins & made a custom mount on top of my ROAM boxes
    · Heavy Duty Tow Strap & Shackles

    MISCELLANEOUS
    · Overland Pros Anza 1400 Extreme Rooftop Tent
    · Overland Pros Wraptor 6K- 270 Degree Freestanding Vehicle Mounted Awning
    · Dometic CFX3 55IM Freezer/Fridge
    · PRO Grill with Raptor Lights (wired into my headlights)

    TO DO LIST
    · GO EXPLORE!
    · Ubolt flip from Wheelers Offroad
    · 12v socket in backseat – always live
    · Nitro Gears 5.29 (eventually will move to 35s)
    · Front Bumper and Warn winch
    · On Board Air

    IMG_20200614_101019_579.jpg
     

    Attached Files:

    Last edited: Feb 25, 2021
    This site contains affiliate links for which the site may be compensated.
    #1
    WharfRat and doublethebass like this.
  2. Jun 25, 2020 at 3:20 PM
    #2
    tacoma_untamed

    tacoma_untamed [OP] Member

    Joined:
    May 15, 2019
    Member:
    #293389
    Messages:
    13
    Gender:
    Female
    Vehicle:
    2018 Tacoma TRD
    ROOF CONFIGURATION
    The 2 Roam Adventure 95L Rugged Cases are ‘permanently’ mounted (bolted on) to my Sherpa Equipment Company front roof rack. Since I also carry Maxtrax Recovery Boards with me & storage space is valuable, I mount the Maxtrax on top of one of the Roam cases.

    20200613_160723.jpg

    Mounting the Roam Adventure Co Cases to the Sherpa Equipment Co Roof Rack
    This roof rack has cross bars that are adjustable & you can move and slide them into your desired location making this setup possible. I chose to center the roam box so I still have room to access my RTT (Roof Top Tent) & opportunity to add lighting in the front at a later date. I also chose to keep the roam boxes close to the edge of the rail, because I store my camp table & chairs up top in between the boxes during trips.

    Materials Needed:
    · Tee Slot Bolts - I used ¼”-20, 2.5” long from Amazon. None of my local hardware stores had these in stock.
    20200625_145417.jpg
    · Nylon Lock Nuts
    · 4 or 8 Fender washers
    · Rubber Grommets
    · Acorn / Cap Nuts
    · Drill
    · Tape Measure

    Steps:

    1) Once you determine where you want your box to sit on your roof rack, measure where you will need to drill holes & then drill the holes at the bottom of the box. I drilled 4 holes, one in each corner. NOTE: there is a drain plug in one corner. I would recommend drilling away from this (and not too close to the edges) because it makes it so much easier to use power tools later on! Quarter turns with a box end wrench or socket makes this process go slow.

    2) I had to use a grinder to shave down the head of the Tee Slot bolts. The tee was just a tiny bit large & wouldn’t slide into the cross rail. Mine did not require much grinding at all, but this step would depend on your roof rack crossbars or your bolt choice.
    20200625_145603.jpg

    3) Unbolt the cross rails from the rack on one side & slide the Tee Slot Bolts into the cross rail. Tighten the bolts on the cross rail back up.

    4) Slide a rubber grommet onto each bolt.

    5) Slide a fender washer onto each bolt (optional).

    6) Set your Roam case on.

    7) Slide another fender washer onto each bold.

    8) Tighten your Nylock Nuts down – power tools make this a breeze. Make sure these are tight so your box doesn’t bounce around.

    9) Once I completed these steps I marked how much bolt was sticking up. I removed everything & cut down the bolt with a saw. I lightly filed the edges. I reassembled everything & then topped with an acorn nut. This is helpful so nothing gets caught or torn on the bolts.
    20200625_145652.jpg 20200625_145642.jpg

    10) I zip tied the handles to the crossbars to prevent them from bouncing around – that will get really loud at freeway speeds.

    20200118_071838.jpg

    My Review
    This is a great mod for utilizing space & storage. These boxes really are tough & waterproof. I don’t think you could break these boxes unless you really tried. I’ve been in all weather with them – heavy rain, hail, snow, below freezing temps, and very high temps and I’ve never had an issue. Even with the holes I drilled in the bottom, I have never had any water leak through. It is also nice you can put locks on these for security.

    The roof rack alone did create some wind noise. I added the boxes on & I didn’t notice any additional noise, but I think no matter what you have up there it will create some level of wind noise. Also, if you only have a few items in the boxes you will hear things bouncing around in the box on trails. If you fill up the boxes up I don’t notice any noise from things bouncing around. My only complain with this setup, is adding these boxes to the roof did serious damage to the gas mileage. I was getting ~16mpg on average (I live in the mountains where it’s very hilly) and with the boxes I was getting about 14mpg and that was on stock tires. Again, where you drive makes a huge difference.

    Mounting the Maxtrax to the Roam Case
    Between my 2 Roam Boxes in front & my RTT in the rear, I ran out of space for exterior Maxtrax storage. With some inspiration & help from my dad, problem solved.

    20200613_130129.jpg

    Materials Needed:
    · Maxtrax Mounting Pins https://maxtraxus.com/product/maxtrax-mkii-mounting-pins/
    · Tape Measure
    · Oscillating Tool
    · Drill
    · Silicone Sealant (optional for extra waterproofing your holes)
    Maxtrax.jpg

    Steps:
    1) Measure where you want your Maxtrax to sit & mark holes where you want to drill for the mounting pins.

    20200624_155226.jpg

    2) Drill holes through the top of the Roam box. Make a mental note of where the holes will hit on the inside, it will effect this next step & you want to make sure you leave yourself some room on the inside.

    3) The Maxtrax mounting pin bolt will slide through your holes but you will not be able to tighten the nut completely due to the double walls on the inside of the case (seriously these cases are tough). So you must use the oscillating tool to make notches. Pictures best explain this step. You could take your time & make this a bit cleaner and file down any edges if you wanted.

    20200624_155211.jpg 20200624_155205.jpg

    4) Tighten the nuts.

    5) I used silicone sealant on the inside where I drilled holes to help with weather-proofing. This is optional.

    My Review
    Another great mod for utilizing space. Even with the holes drilled (and use of silicone) I still find these boxes are 100% waterproof. I have traveled through some heavy rain with this setup. I have the gas struts installed on my Roam cases & the opening and closing of the cases is not in anyway effected by the Maxtrax on top. In other words, the Maxtrax are totally out of the way. 10/10 recommend.
     
    Last edited: Jan 18, 2021
  3. Jun 26, 2020 at 10:36 AM
    #3
    MyOwnTacoma

    MyOwnTacoma New Member

    Joined:
    May 28, 2020
    Member:
    #329596
    Messages:
    2
    Gender:
    Male
    First Name:
    Pat
    Vehicle:
    2020 Tacoma TRD Offroad
    Venom Rex 602 17" BFG KO2 275/70R17 Front Runner Slimline Truck Bed Rack Roam Adventure Co. Cargo Cases Cali Raised Rock Sliders
    Awesome idea of mounting the maxtrax on top of the boxes.

    I did mine the same way for mounting the boxes before but I still found some leaks. So automotive silicone it is for me. But awesome post!!

    942FB3CF-F006-4AE0-8ADD-8AF5CB7AEDE7.jpg
     
    [KD] and tacoma_untamed[OP] like this.
  4. Jun 26, 2020 at 11:33 AM
    #4
    tacoma_untamed

    tacoma_untamed [OP] Member

    Joined:
    May 15, 2019
    Member:
    #293389
    Messages:
    13
    Gender:
    Female
    Vehicle:
    2018 Tacoma TRD
    @MyOwnTacoma I think the rubber grommets under the boxes help with the seal. I also have the Nylocks very tight after I noticed some slight rattling initially.
     
    MyOwnTacoma likes this.
  5. Sep 11, 2020 at 6:31 AM
    #5
    tacoma_untamed

    tacoma_untamed [OP] Member

    Joined:
    May 15, 2019
    Member:
    #293389
    Messages:
    13
    Gender:
    Female
    Vehicle:
    2018 Tacoma TRD
    Suspension Refresh – July 2020

    After 2 years of building and driving the taco, a suspension refresh was much needed due to all the weight I had added over time.

    REAR AAL

    Originally, I just ran with the Dakar medium duty leaf springs. It gave my truck an additional 2” over factory ride height, even with the camper shell. I personally thought the ride was perfect- not to stiff.

    Flash forward 2 years and I purchased a RTT (roof top tent) weighing in at about 190lbs. Between the Snug Top Camper Shell, Tepui RTT, Sherpa Equipment Co Roof Rack, 2-3 large dogs that ride in back, and all of my camping gear (including firewood), the rear end started to sag- a lot. The leaf springs lost their arch. Had I seen this coming I definitely would have purchased the heavy duty leaf springs to begin with – but I didn’t see myself getting as crazy as I did. One purchase always leads to another. Now I am here.

    A relatively easy fix was to purchase and install the AAL. I wanted to start with this before I “started over” and went with the heavy-duty leaf springs because it is a more budget friendly option. I had been happy with my suspension – I just have exceeded the weight limits & needed to modify. OME states the AAL should raise the ride height 15mm and increase the spring rate by an additional 15%*.

    The install was a relatively easy process- there are a few different write ups and videos on the AAL installation on this forum already. One thing I wish I knew up front is I would need longer center pins – I had cut my pins down when I installed the leaf springs last time and there were not enough threads with the new spring. My U-bolts were fine, but I didn’t modify my already extended U-bolts.

    When everything was done, I would say I did get approximate a 0.25” ride height- but more importantly the truck does feel better.

    *https://www.headstrongoffroad.com/store/p279/OME_Add-a-leaf_(PAIR)_-_EL46XL_.html

    Rear Bump Stops

    I switched out the factory bump stops for the Wheelers SuperBump Bumpstops & I wish I had done this right from the start. The rebound clip on the leaf springs was acting as the Bumpstop with the added weight of everything. Photos below. Easily fixable & no permanent damage.

    20200722_193039.jpg

    It has been about 2 months and there has been a handful of trips in the books & I’ve been very happy with the new bump stops. No harsh bottoms outs!

    20200723_175214.jpg

    Front

    I switched the King coil spring from 600# to 650# after adding full RCI steel skid plates. With the skid plates, the Dometic fridge in the cab, & some additional storage up top, the 600# springs felt too soft. I do not know that I got any additional lift out of the new springs (I did not measure beforehand) but it does ride better with it being a fuzz stiffer. I will be adding a dual battery in a few weeks & I wanted to be prepared for the weight.

    I almost went with the 700# springs, but I will upgrade to those someday when I get a front bumper & winch. For now, the 650# suits my needs. I have not switched out my front bump stops yet, but that will come soon.

    NOTE: I did need an alignment after the new coil springs were installed.
     
  6. Oct 26, 2020 at 8:00 PM
    #6
    tacoma_untamed

    tacoma_untamed [OP] Member

    Joined:
    May 15, 2019
    Member:
    #293389
    Messages:
    13
    Gender:
    Female
    Vehicle:
    2018 Tacoma TRD
    Snug Top Rebel Truck Cap and RTT Mount
    I purchased the topper new from Top This Outfitters in Nevada County and have had it for 2 years. I have used it in a variety of different ways, so I have a good feeling for what works and what does not. I feel it is also important to note that I drive A LOT (including rough trails) and I’m not easy on my vehicle. I buy stuff to use it to it’s full extent– so keep that in mind.

    IMG_20201017_183034_421.jpg

    Why did I choose Snug Top?
    It was between Snug Top and A.R.E and once I knew what options I wanted, it just came down to price (although very comparable). I did not look much into Leer only because I had not heard the best reviews about the retailer in my area. Top This Outfitters was an absolute delight to work with & I would highly recommend them. If you visit this retailer’s website they have a list of questions you can answer to help determine what will work for your needs.


    What features do I have or wish I had?
    The main reason for this setup is for the dogs & security. The pups love it back there and I love a clean truck. Because of this I opted for the sliding windows with pet screens. The drop down / sliding window in the front is really nice for not only washing the back window on the truck, but I have dropped a number of things in that tiny space between the truck and the shell (hardware, tools, tie downs, ect) and the drop down window makes things really easy to grab so nothing gets stuck! I added the LED lighting because I do a lot of camping and the lights are a luxury. I also had the tracks installed (for mounting anything up top) at the time of purchase by Snug Top – I was told if you add the tracks at a later date it will void the warranty. Snug Top has some other cool options that I didn’t go with- like the "pop out" side windows (Windoors) OR the back window latch can program to your key fob- but it’s easy to get carried away & I try to keep it practical - sometimes ;)


    Would I buy it again? Overall, I have been happy with the topper, but it has not been without issues…

    After ~8 months with the topper I mounted my Sherpa Equipment Co roof rack. There was quite a bit of noise from the rack, but I expected that. I loved the extra storage and I love how lightweight but durable the rack is. I highly recommend using Loctite when mounting the rack to the track system on the topper. I learned the hard way.

    Another 6 months and I mounted my Tepui RTT. After having the RTT on for about 3 months, my back window on the shell would not shut – you really had to slam it in order for it to latch. I took it to the retailer I purchased it from & the shell had slid every so slightly forward. After 2 minutes (no charge) they repositioned it and it has worked fine ever since. I was told every now and then these shells can move ever so slightly – especially when getting tossed around on the trails.

    Then recently one of the struts that the hold up the back window fell off – I had the strut replaced but it fell off again that week. It turns out the fiberglass / frame was cracked- photo below (where the liner came unglued). The topper is under warranty still so I had it sent back to Snug Top for repairs, but I was without my topper for 5 weeks. I do not know what caused the shell to break – my RTT + roof rack is far under the weight limit that the topper is rated for. It could be the weight, combined with rough trails? Or, it could have just been a coincidence which is fixed now. I have my new Overland Pros RTT mounted up there now & so far, so good!

    Note: I don't currently have bed stiffeners and I haven't had any issues but I do plan on adding this soon as I've heard of some people having issues down the road.

    20200902_122737.jpg

    How do I like my RTT on my topper?
    It works! I think I would rather have a bed rack where the tent sits lower and it’s more aesthetically pleasing, but that just doesn’t work with my application right now.

    My truck is on 33s and the Kings add about +2” over stock ride height. The tent might look like it sits too high but after setting it up a few times I now know exactly where to stand and what angles I need for setup. I’m 5’ 5” and after a few practice runs the setup and take down is now a piece of cake. I stand on my rock sliders, tires, and tailgate to reach everything- so if you don’t have sliders or steps you may have to open your door and use the inside of the truck as a step.

    A few additional thoughts: the RTT is basically like putting a big brick on top of your truck. It is noisy, the MPGs suffer, and I can feel it while driving. The benefits outweigh the negatives for me, but this is important to note.

    And finally, a comment on theft. I did have someone *try* to steal my RTT once when I was parked at a river for a day trip. They were unsuccessful. They did this by removing all of the bolts that mount my roof rack to my truck cap rails. Maybe they realized it was too heavy for one person? I’m not sure but they never did attempt to remove just the tent or just the crossbars on the rack…so have awareness.

    IMG_20201019_063133_820.jpg
     
    Last edited: Oct 28, 2020
  7. Oct 28, 2020 at 4:00 PM
    #7
    velomutt

    velomutt Well-Known Member

    Joined:
    Sep 8, 2018
    Member:
    #265642
    Messages:
    168
    Gender:
    Male
    Vehicle:
    2018 Taco DCLB OR INFERNO
    A bunch of Meso Custom stuff.
    Thanks for your post. Question: did you go with the Sportsman Package on your Snugtop Cap?
    (the extra thick roof).
     
    boston23 likes this.
  8. Oct 29, 2020 at 7:11 AM
    #8
    barnes828

    barnes828 Well-Known Member

    Joined:
    Sep 27, 2020
    Member:
    #342136
    Messages:
    91
    Gender:
    Male
    First Name:
    Nathan
    Vancouver, Wa
    Vehicle:
    21’ DCLB OR WHITE
    Have you done anything to prevent further theft attempts of your gear? I know that if someone wants something bad enough they’re going to find a way. Great post and write up. Great looking truck!
     
  9. Oct 29, 2020 at 10:47 AM
    #9
    tacoma_untamed

    tacoma_untamed [OP] Member

    Joined:
    May 15, 2019
    Member:
    #293389
    Messages:
    13
    Gender:
    Female
    Vehicle:
    2018 Tacoma TRD
    @velomutt No, it wasn't the sportsman's package.

    @barnes828 Not really - I haven't come up with a good solution to protect the theft of the RTT... If I hear of any ideas I will certainly share! I'm just careful where I park for extended periods of time.
     
  10. Oct 29, 2020 at 10:52 AM
    #10
    boston23

    boston23 Well-Known Member

    Joined:
    Sep 4, 2019
    Member:
    #304290
    Messages:
    3,732
    Gender:
    Male
    First Name:
    Adam
    Eastie
    Vehicle:
    2019 SR5 DCSB 4x4
    Beautiful cement taco

    Love to see rtt & fiberglass shell combo. Hoping to get the new GFC superlite on mine eventually
     
    tacoma_untamed[OP] likes this.
  11. Dec 17, 2020 at 10:25 AM
    #11
    PDXTaco55

    PDXTaco55 Member

    Joined:
    Feb 16, 2017
    Member:
    #210709
    Messages:
    12
    Gender:
    Male
    Portland, OR
    Vehicle:
    2017 DC SB OR
    Snugtop Rebel Baja Design Squadron Sport fogs Xenon Depot HID low Rigid Midnight Edition ditch Mountain Hatch Tailgate Insert Total Chaos Bed stiffeners 3TPAM Sherpa cab and canopy racks BAMF rock sliders 265/70/17 Nitto ridge grapplers
    Thanks for sharing your insights and experiences, this is very helpful! Also I’m a big fan of your setup (perhaps partially biased...). A couple questions I hope you could help with:

    1) Can you share more about using locktite on the Sherpa? I just ordered the grand Teton and crows nest myself, so looking forward to installing in the next month (or whenever they fulfill the Black Friday orders). I also went with and extra set of mounting feet for the crows nest, based on other TW comments about the yakima tracks pulling out of our SnugTop.

    2) I’ve held off on the suspension so far, thinking that I wanted to get most of the planned weight added before landing on the right setup. I plan to add front and rear bumpers, rock sliders, and skids. I already notice the bed sag when I’m fully loaded for extended camping, especially when using my RTT. Do you think my logic of bucking the trend and doing suspension last makes any sense? Or bite the bullet and accept I’ll have to upgrade down the road? I don’t get on anything too technical, but plenty of washboards and ruts.

    Thanks again for putting this post together and good luck on your future upgrades!

    A35BE1BF-CF46-4611-94BB-3BA173E8CEE3.jpg BFC5698F-96EE-4B37-A4C4-ADD169835F20.jpg


  12. Dec 17, 2020 at 10:36 AM
    #12
    PDXTaco55

    PDXTaco55 Member

    Joined:
    Feb 16, 2017
    Member:
    #210709
    Messages:
    12
    Gender:
    Male
    Portland, OR
    Vehicle:
    2017 DC SB OR
    Snugtop Rebel Baja Design Squadron Sport fogs Xenon Depot HID low Rigid Midnight Edition ditch Mountain Hatch Tailgate Insert Total Chaos Bed stiffeners 3TPAM Sherpa cab and canopy racks BAMF rock sliders 265/70/17 Nitto ridge grapplers
    I may have answered my own question...I’m now thinking that you mean using blue thread locker on the bolts. For some reason I was thinking you meant using loctite in the actual track to hold the anchor plates in place. My Energy drink is still kicking in... :facepalm:

     
    tacoma_untamed[OP] likes this.
  13. Jan 18, 2021 at 3:29 PM
    #13
    tacoma_untamed

    tacoma_untamed [OP] Member

    Joined:
    May 15, 2019
    Member:
    #293389
    Messages:
    13
    Gender:
    Female
    Vehicle:
    2018 Tacoma TRD
    @PDXTaco55 Sorry I am just seeing this post.

    1) Yes - I used blue thread locker on the bolts.

    2) Suspension is really just a matter of personal preference. For me, my build is a slow process, so I upgrade and change out parts as I need them. The suspension was one of my first upgrades. Then as I added more weight, I did the AAL about a year in. Now that I'm adding a rear bumper, I'll be switching out the rear leaf springs entirely. In my opinion, this is the best way to do it for performance. Doing it this way absolutely takes more time and more money, so I could understand just waiting.
     
  14. Oct 25, 2021 at 7:15 AM
    #14
    JDSmith

    JDSmith The Overland Shop, VT

    Joined:
    Aug 28, 2018
    Member:
    #264364
    Messages:
    988
    Gender:
    Male
    First Name:
    Jesse
    Essex Jct, Vermont
    Vehicle:
    21 Pro MGM MT
    Oh man…
    Awesome build! Seeing the Roam 95’s up top definitely made my mind up on them. Looks like they were made to be on top of the Tacoma :cool:
     

Products Discussed in

To Top