1. Welcome to Tacoma World!

    You are currently viewing as a guest! To get full-access, you need to register for a FREE account.

    As a registered member, you’ll be able to:
    • Participate in all Tacoma discussion topics
    • Communicate privately with other Tacoma owners from around the world
    • Post your own photos in our Members Gallery
    • Access all special features of the site
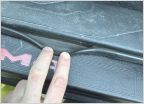
Solar Panel Roof Mount Build With Articulating Arm

Discussion in '3rd Gen. Tacomas (2016-2023)' started by cactushead, Oct 11, 2019.

  1. Oct 11, 2019 at 2:49 AM
    #1
    cactushead

    cactushead [OP] Well-Known Member

    Joined:
    Sep 12, 2015
    Member:
    #164087
    Messages:
    289
    Gender:
    Male
    San Diego
    Vehicle:
    2017 MGM DCSB 4x4 TRDOR
    Front hitch, 5100's, 885's, Snugtop XV, Slimline II, Sumos, bed platform, AAL, interior LED lights in cab and bed, exterior camp/backup LED's, Rigid DOT Fogs and D2 Pro Spots, Mega Ultra +130 bulbs, heavy-duty fog light, spot light, and low beam wiring harness, Weathertech mats, Re-routed dif breather and A/C drip line, dash cam, front and side cameras, anytime rear camera and nav, Blue Seas fused bus bars to cab and bed, heavy-duty bus bar w/Anderson quick disconnects under the hood for powering winch, solar, air compressor, and other accessories.
    I found a great deal on a Dometic CFX-40, which led to the purchase of an X2 AGM 24F deep cycle/starter battery. Since most of my driving consists of short trips, I was concerned this would shorten my battery life.

    A solar power system was the obvious next upgrade. There are four criteria for this build:
    1. the panel must lay flat when traveling,
    2. the panel must be able to angle approximately 45 degrees towards the sun,
    3. the panel must be able to rotate in all directions,
    4. the panel must be able to be used on either my FrontRunner rack (shell) or my Thule load bars (mounted on the OEM cab rack).
    To accomplish this feat, I needed to build a base/mount to support the panel and a bracket that attaches to the panel. The key component of this build is the RAM mount arm. It connects the base to the bracket. The one I have is about 5" long. With an 1.5" ball on each end of the arm, it is approximately 8" in overall length.


    The ball attached to the base allows the arm to go from vertical to a horizontal position, and vice versa. This allows the panel to lay flat on the rack when traveling and then raise it when the vehicle is parked. The ball attached to the bracket lets you set the angle to the sun, as well as follow the sun as it moves across the horizon.

    The base I made sits below the load bars in order for the panel to rest on the load bars. The wood base allows me to use the base on my Front Runner Rack. If I want to use it with Thule load bars, I remove the wood and then attached the Mighty Mounts that fit the load bars.

    The first component I made was the base. With this mounted onto the rack and the RAM mount attached, I could now use a piece of cardboard the size of the panel to help design the bracket and placement of the attached ball.

    The bracket pieces were cut and then mounted onto a board in preparation for welding.

    On Wednesday, it was welded. The next day I cleaned it up, then placed it on the panel and drilled the mounting holes.

    Prior to painting the bracket, I test fitted the bracket on the rack.

    I plan on finishing it by this weekend.
     
    superdenk, 2ayne, ponts and 5 others like this.
  2. Oct 11, 2019 at 3:11 AM
    #2
    deanosaurus

    deanosaurus Caveman

    Joined:
    Jul 23, 2018
    Member:
    #260241
    Messages:
    2,073
    Northeast Region
    Vehicle:
    09 TRD OR AC
    That's pretty slick. What's the total weight of the load (bracket + panel) on the arm?
     
  3. Oct 11, 2019 at 3:48 AM
    #3
    snickers

    snickers My new, overpriced heaping pile of shit

    Joined:
    Nov 22, 2017
    Member:
    #236679
    Messages:
    2,190
    Gender:
    Male
    Vehicle:
    2024 Tacoma Tailhunter 5ft bed Bronze Oxide
    Have you considered a flexible panel attached with industrial velcro and really long cord? I traveled over two months with that and a portable lithium pack. Can pop any side up on the roof with your props of choice. In my case, running shoes. Or detach completely in case a confined campsite had your truck in shade and you have a sun spot. With the truck running, used switching device (my hands) to truck's inverter.
     
  4. Oct 11, 2019 at 4:05 AM
    #4
    POOLGUY

    POOLGUY Well-Known Member

    Joined:
    Feb 19, 2013
    Member:
    #97958
    Messages:
    10,985
    Gender:
    Male
    First Name:
    JEFF
    ALABAMA
    Vehicle:
    2008 TRD Sport 6sp, 2015 TRD Offroad 6sp
    Dobinsons suspension
    :thumbsup: In for finished project.
     
  5. Oct 11, 2019 at 10:25 AM
    #5
    cactushead

    cactushead [OP] Well-Known Member

    Joined:
    Sep 12, 2015
    Member:
    #164087
    Messages:
    289
    Gender:
    Male
    San Diego
    Vehicle:
    2017 MGM DCSB 4x4 TRDOR
    Front hitch, 5100's, 885's, Snugtop XV, Slimline II, Sumos, bed platform, AAL, interior LED lights in cab and bed, exterior camp/backup LED's, Rigid DOT Fogs and D2 Pro Spots, Mega Ultra +130 bulbs, heavy-duty fog light, spot light, and low beam wiring harness, Weathertech mats, Re-routed dif breather and A/C drip line, dash cam, front and side cameras, anytime rear camera and nav, Blue Seas fused bus bars to cab and bed, heavy-duty bus bar w/Anderson quick disconnects under the hood for powering winch, solar, air compressor, and other accessories.
    The panel is 15.5 lbs and the bracket is 3.5 lbs. I am less concerned about the weight as I am about strong winds hitting the large surface area. Those RAM balls grip really tight, so I don't think the panel will shift from the force of the wind. I may add support arms or guy ropes if my calculations are off. The other alternative is to just leave the panel down if it becomes too windy.

    Your method is very versatile, but the framed panels work better for my needs.
     
    deanosaurus[QUOTED] likes this.
  6. Oct 11, 2019 at 10:29 AM
    #6
    bot102

    bot102 The guy who ask a lot of questions

    Joined:
    Oct 19, 2016
    Member:
    #200156
    Messages:
    2,465
    Gender:
    Male
    First Name:
    Alec
    Castle Rock, CO
    Vehicle:
    2017 DCOR
    Beat up armor and broken stuff
    I've heard those flexible panels break VERY easily despite being "flexible" . @YamaDirtrider Didn't yours crack just from the contour of your cab and lose a bunch of efficiency?

    I have a Renogy 100w solid panel, love it! Similar setup to OP just without the arm.
    20190415_183335_HDR.jpg
     
  7. Oct 11, 2019 at 10:33 AM
    #7
    deanosaurus

    deanosaurus Caveman

    Joined:
    Jul 23, 2018
    Member:
    #260241
    Messages:
    2,073
    Northeast Region
    Vehicle:
    09 TRD OR AC
    I was mostly thinking of the forces of that assembly acting on any kind of lever arm (the derived lever arm from the dimension of the panel itself and the mount arm) if it starts bouncing in the wind. Probably fine as long as you check the hardware after a storm, and you don't exactly sound like a dummy. :thumbsup:
     
    Last edited: Oct 11, 2019
  8. Oct 11, 2019 at 10:43 AM
    #8
    YamaDirtrider

    YamaDirtrider Custom bumpers @FORT-ifyRigs

    Joined:
    Mar 1, 2016
    Member:
    #179877
    Messages:
    6,344
    Gender:
    Male
    First Name:
    Josh
    Elizabeth CO
    Vehicle:
    06 DCLB sport postrunner
    What hasn't been modified?
    Yea. I thing part of my problem is I used double sided tape all the way around the outer edge. I Should have left the ribs in the roof untaped and it may have worked better.
     
  9. Oct 11, 2019 at 10:44 AM
    #9
    Tacospike

    Tacospike Semi-Unknown Custodial Member

    Joined:
    Nov 19, 2018
    Member:
    #273198
    Messages:
    14,420
    Gender:
    Male
    512
    Vehicle:
    16 Tacoma TRD Sport DCSB / 17 Tundra 5.7L 4X4 CM
    Two Trucks
  10. Oct 11, 2019 at 11:14 AM
    #10
    snickers

    snickers My new, overpriced heaping pile of shit

    Joined:
    Nov 22, 2017
    Member:
    #236679
    Messages:
    2,190
    Gender:
    Male
    Vehicle:
    2024 Tacoma Tailhunter 5ft bed Bronze Oxide
    Two months full time on the road. Twice blown off my cap roof going through automatic car washes(Seattle Costco, Salt Lake) because well the driver is at that forgetful age.

    Edit: 18 National parks, 14 states and many POIs in between. Deserts, rain forests, 109 degrees to 32 degrees, 12K elevation to sea level. Not bragging about me but describing what the panel went through.
     
    Last edited: Oct 11, 2019
  11. Oct 23, 2019 at 9:03 AM
    #11
    cactushead

    cactushead [OP] Well-Known Member

    Joined:
    Sep 12, 2015
    Member:
    #164087
    Messages:
    289
    Gender:
    Male
    San Diego
    Vehicle:
    2017 MGM DCSB 4x4 TRDOR
    Front hitch, 5100's, 885's, Snugtop XV, Slimline II, Sumos, bed platform, AAL, interior LED lights in cab and bed, exterior camp/backup LED's, Rigid DOT Fogs and D2 Pro Spots, Mega Ultra +130 bulbs, heavy-duty fog light, spot light, and low beam wiring harness, Weathertech mats, Re-routed dif breather and A/C drip line, dash cam, front and side cameras, anytime rear camera and nav, Blue Seas fused bus bars to cab and bed, heavy-duty bus bar w/Anderson quick disconnects under the hood for powering winch, solar, air compressor, and other accessories.
    Here's the short version: With a few modifications, it works very well! The Front Runner rack is the perfect complement for this stealthy mod. The panel is barely visible to someone walking by as it sits only .4" above the rails.
    The panel is held to the rack by the front and rear clamp,
    and the lowered arm.
    Rubber feet were added to the corners, which combined with the weatherstripping under the lip on the clamps, keeps the panel from moving. When positioning the panel, the feet allows the panel to slide on the rack without scratching the paint.
    If the panel is positioned over the side rail, the white block under the corner of the panel takes the strain off of the ball mount. In addition, it provides a third point of contact which improves its stability.
    The 5.5" arm was replaced with a 9" arm. This change enables the panel to be flipped upside down while maintaining 40 degrees of angle. Also, with the center of gravity below the ball mount, the panel becomes very stable.
    Even with the ball mount in the lower position, the panel had very little wobble with the 9" arm.
    The ball mount in the lower position. The cable attached to the panel provides security as well as keeps it from becoming a projectile.
     
    Last edited: Oct 23, 2019
    sheld, deanosaurus, TWTaco and 4 others like this.
  12. Oct 23, 2019 at 4:54 PM
    #12
    blackmist27

    blackmist27 Well-Known Member

    Joined:
    Aug 16, 2017
    Member:
    #227016
    Messages:
    174
    Gender:
    Male
    Vehicle:
    17 Tacoma TRD Pro
    Leer shell 100XR
    some amazing set ups!
     
  13. Oct 23, 2019 at 5:25 PM
    #13
    Tallwalker

    Tallwalker Too tall to hide, too old to run.

    Joined:
    Jul 3, 2019
    Member:
    #298213
    Messages:
    163
    Gender:
    Male
    Nice idea! I did something similar sorta. I operate emergency comms so need extended power options for radio equipment. Put 2ea 100W panels bolted together on the parts I robbed from a lazy Susan with ball bearing support and an adjustable length tiller extension I had left over from a Laser class sailboat to adjust height. Fit perfectly on the rack for transport but didn’t like having to park in the damn sun for the panels to work! Always tilted it off and set it up in the sun with the battery and parked in the shade with an ice chest and a cold beer. ;)

     
  14. Oct 23, 2019 at 5:48 PM
    #14
    tielur

    tielur Well-Known Member

    Joined:
    Jun 4, 2019
    Member:
    #295301
    Messages:
    61
    Gender:
    Male
    First Name:
    Tyler
    Arizona
    Vehicle:
    2019 Cement Tacoma DCSB Off-Road
    Are you running that anetenna into the cab? If so what are you running it through? I recently installed a weboost and I ran it into the door then into the rubber along the door. That looks nice though.
     
  15. Oct 23, 2019 at 5:50 PM
    #15
    bot102

    bot102 The guy who ask a lot of questions

    Joined:
    Oct 19, 2016
    Member:
    #200156
    Messages:
    2,465
    Gender:
    Male
    First Name:
    Alec
    Castle Rock, CO
    Vehicle:
    2017 DCOR
    Beat up armor and broken stuff
    Nope. It's a mag mount. Running the cable back into the rear sliding window, under the seats up to the center console
     
  16. Oct 23, 2019 at 5:51 PM
    #16
    tielur

    tielur Well-Known Member

    Joined:
    Jun 4, 2019
    Member:
    #295301
    Messages:
    61
    Gender:
    Male
    First Name:
    Tyler
    Arizona
    Vehicle:
    2019 Cement Tacoma DCSB Off-Road
    Ahh ok so that's something that isn't' permanently there when you are driving.
     
  17. Oct 23, 2019 at 5:53 PM
    #17
    bot102

    bot102 The guy who ask a lot of questions

    Joined:
    Oct 19, 2016
    Member:
    #200156
    Messages:
    2,465
    Gender:
    Male
    First Name:
    Alec
    Castle Rock, CO
    Vehicle:
    2017 DCOR
    Beat up armor and broken stuff
    Nope again lol. I leave it on 24/7 365. Was driving through the desert in Nevada with roughly 70MPH winds, didn't move an inch
     
  18. Oct 23, 2019 at 5:57 PM
    #18
    tielur

    tielur Well-Known Member

    Joined:
    Jun 4, 2019
    Member:
    #295301
    Messages:
    61
    Gender:
    Male
    First Name:
    Tyler
    Arizona
    Vehicle:
    2019 Cement Tacoma DCSB Off-Road
    Sorry for the confusion lol. So that means you leave your rear window open 24/7 I guess? Here's what I'm talking about with my rig. Was just trying to see if there was a better way to run that. So your picture intrigued me

    [​IMG]
    [​IMG]
     
  19. Oct 25, 2019 at 1:26 PM
    #19
    cactushead

    cactushead [OP] Well-Known Member

    Joined:
    Sep 12, 2015
    Member:
    #164087
    Messages:
    289
    Gender:
    Male
    San Diego
    Vehicle:
    2017 MGM DCSB 4x4 TRDOR
    Front hitch, 5100's, 885's, Snugtop XV, Slimline II, Sumos, bed platform, AAL, interior LED lights in cab and bed, exterior camp/backup LED's, Rigid DOT Fogs and D2 Pro Spots, Mega Ultra +130 bulbs, heavy-duty fog light, spot light, and low beam wiring harness, Weathertech mats, Re-routed dif breather and A/C drip line, dash cam, front and side cameras, anytime rear camera and nav, Blue Seas fused bus bars to cab and bed, heavy-duty bus bar w/Anderson quick disconnects under the hood for powering winch, solar, air compressor, and other accessories.
    My solar charge controller is mounted temporarily under my front seat. For now, I’m running the wires through the rear window. When I close the window, I make sure it is loose on the wires. The noise level on the freeway is not bad. Looking through the window, I hardly notice the wire is there.

    Eventually, I'd like to have a dedicated battery located in the bed. If and when that happens, I'll pop a hole through the roof of the shell and use a waterproof gland. This is a much cleaner look.

    If you’re looking for an entry point to the cab, there’s a 2” rubber plug under the driver’s seat. You’ll have to cut a hole through the carpet or run the wire under it and to the door. Pop the threshold off and run your wires along the floor and up the kick panel to the dash.
     
    Last edited: Oct 25, 2019
  20. Oct 26, 2019 at 6:42 AM
    #20
    GoGoGadget

    GoGoGadget Well-Known Member

    Joined:
    Aug 27, 2016
    Member:
    #195662
    Messages:
    1,455
    Gender:
    Male
    Vehicle:
    2017 DCLB OR

Products Discussed in

To Top