1. Welcome to Tacoma World!

    You are currently viewing as a guest! To get full-access, you need to register for a FREE account.

    As a registered member, you’ll be able to:
    • Participate in all Tacoma discussion topics
    • Communicate privately with other Tacoma owners from around the world
    • Post your own photos in our Members Gallery
    • Access all special features of the site

Scratch Repair - Surface level

Discussion in 'Detailing' started by phife94, Dec 21, 2023.

  1. Dec 21, 2023 at 10:45 AM
    #1
    phife94

    phife94 [OP] Member

    Joined:
    Aug 1, 2018
    Member:
    #261319
    Messages:
    7
    Gender:
    Male
    Vehicle:
    2012 Grey Prerunner
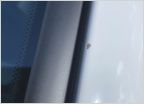
    Hello, I am looking to repair some surface level paint scratches. Not sure if a pen or spray kit makes sense because of the length of some of the scratches. Any product recommendations or tips on how to fix these scratches are much appreciated.


    [​IMG][​IMG][​IMG][​IMG]
     
  2. Dec 21, 2023 at 10:47 AM
    #2
    iwashmycar

    iwashmycar a lot

    Joined:
    May 16, 2014
    Member:
    #129960
    Messages:
    2,023
    Gender:
    Male
    First Name:
    Adam
    Lewis Center, Ohio
    Vehicle:
    07 FJ 4x4 AT
    33's | 3" | skids | rails | dent | CB | lights | dingus
    Good detailer can buff those out easily.
     
  3. Dec 21, 2023 at 10:57 AM
    #3
    T Fades

    T Fades Well-Known Member

    Joined:
    Aug 17, 2011
    Member:
    #61862
    Messages:
    2,760
    Gender:
    Male
    Simi Valley, CA
    Vehicle:
    '11 PreRunner V6 2wd DCLB
    Satoshi, debadged, rear view mirror bracket, tail gate hose clamps, trimmed mud flaps.
    Wash truck good, then use a compound polish.
     
  4. Dec 22, 2023 at 8:34 AM
    #4
    EveryDayIsTacoTues

    EveryDayIsTacoTues Well-Known Member

    Joined:
    Jul 6, 2023
    Member:
    #428392
    Messages:
    244
    Gender:
    Male
    Vehicle:
    2012 Pyrite Mica DCLB TRD Sport
    Like iwash and T said, get the paint nice and clean and you can do it yourself if:

    1. Do the scratches disappear when you hit the area with water (spray bottle of water, etc.)? If they are hidden with water/soap and reappear as the water dries/flashes off, then those are simply in the clear and you can take em out.
    2. Grab a nice terry cloth towel/bonnet or buffing pad.
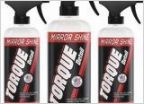
    3. Get a compound, cut and polish kit. Having a Dual Action Random Orbital polisher (DA Polisher for short) would definitely help, but some elbow grease can get you there too.

    Take your pick on the paint correction/polishing kit: Chemical Guys, Meguiar's, whatever.
    Example:
    [​IMG]
    They'll usually be numbered so you now what's the first step and what's the last step (first is typically the most aggressive). I'd suggest taking one of the less aggressive steps like a Compound (or maybe even a Cutting) Polish and see if it takes it out first. If it doesn't, go to a more aggressive step, and then work your way back up to a standard Polish to finish it. Look up technique on Youtube, tons of detail videos, it's honestly not hard. If you're doing it by had, it'll be pretty impossible to make matters worse. It gets dicey when you use rotary polishers and don't have the knack for speed, movement, etc. DA Polishers help minimize risk and why I'd always recommend it unless you're going pro/are experienced. Rotaries definitely crank out more powah babeh, but it also is high risk/reward.

    Just remember that basically all paint correction is doing is making micro-scratches in the clear and taking the clear down to the same level of the scratch so light doesn't catch the jagged edge and hides it. Don't be afraid if it looks a bit dull at first, especially if you're doing it by hand, as you'll bring the shine back by using progressively finer less aggressive compound and polish. This does lessen your thickness of clear coat, but that's why it's better to start LESS aggressive if it gets the job done.

    If the scratches don't disappear when hit with water and soap, that means it's fully through the clear and the only option is to use paint and clear to really fix it. Start with polishing to see how much you can get out first.
     
    T Fades likes this.
  5. Dec 24, 2023 at 2:34 AM
    #5
    VaToy

    VaToy Life Long Member

    Joined:
    Mar 26, 2018
    Member:
    #248467
    Messages:
    4,682
    Gender:
    Male
    Parts Unknown
    Vehicle:
    2018 TRD DCLB Sport 4x4 Silver Sky
    Bilsteins 5100s on the top setting, 4runner Gray TRD Pro Sema wheels, 285/70/17 Toyo AT3s, Sumo Bump stops, TRD exhaust, ECGS Clamshell bushing, 1/4 shim for the lean and one inch rear block, OEM Pro grill and garnish OEM TRD Skid plate, TRD CAI, Demon Brackets, Rigid Industries Pro fog lights, OEM Trail Rails sidebars, Diode Dynamics LED SL1 high and low beam lights, OEM Roof racks, Clazzio leather heated seats, Remote Start, TRD Pro shift knob, tinted windows, Rockford Fosgate 4 channel amp for the headunit and sub and amp combo, OEM Puddle lights, OEM tailgate lock, OEM bed mat, LED interior lights, OEM blackout kit for letters, JLT catch can, upgraded 27F toyota True Start battery, Vleds led tail light kit with Pro tail lights, OEM Rave4 side mirrors with convex spotters,just to name a few mods.
    I would wet sand it with some 2500 then 3500, just nibbing it down some or your just polishing the scratch. Looks like an easy fix.
     
  6. Dec 30, 2023 at 9:24 AM
    #6
    Too Stroked

    Too Stroked Well-Known Member

    Joined:
    Jan 24, 2017
    Member:
    #208501
    Messages:
    3,881
    Gender:
    Male
    First Name:
    Tom
    South shore of Lake Ontario
    Vehicle:
    2021 4Runner SR5 Premium
    Before you do anything, can you feel the scratches with your fingernail?
     

Products Discussed in

To Top