1. Welcome to Tacoma World!

    You are currently viewing as a guest! To get full-access, you need to register for a FREE account.

    As a registered member, you’ll be able to:
    • Participate in all Tacoma discussion topics
    • Communicate privately with other Tacoma owners from around the world
    • Post your own photos in our Members Gallery
    • Access all special features of the site

Repainting a camper shell?

Discussion in 'Tonneau Covers, Caps and Shells' started by snapspinner, Nov 11, 2022.

  1. Nov 11, 2022 at 9:44 AM
    #1
    snapspinner

    snapspinner [OP] Well-Known Member

    Joined:
    Feb 24, 2018
    Member:
    #245432
    Messages:
    616
    Gender:
    Male
    First Name:
    Shawn
    Vehicle:
    2023 TRD OD DCSB Electric Lime
    Has anyone here repainted a truck topper/camper shell? I'm considering doing it myself and I would love to hear about your experiences with it. I'm no professional painter but I've spray painted things before and realize the sanding and prep work is the largest part of the job.

    If I do this, my plan is the following.
    1. Build a stand with casters on it to hold it while I work on it.
    2. Mask off the things I might hit with a sander.
    3. Sand the current paint to scuff up the surface.
    4. Remove masking, clean everything and mask everything this time.
    5. Prime it.
    6. light sanding, clean again, tack rags.
    7. Color coat.
    8. Several coat of clear.

    What did I miss?

    Despite all this thought I'm going to see what some local body shops could do as well and if the cost isn't too much, I'll probably let them do it.
     
    six5crèéd likes this.
  2. Nov 16, 2022 at 7:20 AM
    #2
    Lgeekdws

    Lgeekdws Well-Known Member

    Joined:
    Nov 13, 2019
    Member:
    #310590
    Messages:
    112
    Gender:
    Male
    Vehicle:
    2015 Magnetic Grey V6 4x4 SR5
    Bondo on any scratches, dings. I'd pull the windows and hardware instead of masking, you probably should replace weather stripping anyway. Wipe down with solvent before primer. If you do the prep work your favorite body shop might give you a break on the paint cost if you are flexible about when you need it back. They can hit it between big jobs.
     
  3. Nov 16, 2022 at 1:23 PM
    #3
    snapspinner

    snapspinner [OP] Well-Known Member

    Joined:
    Feb 24, 2018
    Member:
    #245432
    Messages:
    616
    Gender:
    Male
    First Name:
    Shawn
    Vehicle:
    2023 TRD OD DCSB Electric Lime
    Thanks for your reply. Yeah, I think pulling the windows would make it much easier to paint. If I can only get them out without breaking them:). I'm thinking it's looking likely that I'll be doing this, since most of the body shops I've talked to so far are saying it will be 2 - 3 months before they could work on it. Must be a good time to be a paint and body guy.
     
    six5crèéd likes this.
  4. Nov 16, 2022 at 1:27 PM
    #4
    six5crèéd

    six5crèéd Be the light

    Joined:
    Jul 9, 2019
    Member:
    #298734
    Messages:
    35,300
    Gender:
    Male
    First Name:
    Bruce, or Crèéd, neither is correct.
    Southern Virginia
    Vehicle:
    8 lugs no plugs
    I painted mine with harbor freight bedliner. Looks great from 23’ away :anonymous:

    CBFE079B-4F1C-4801-ABC6-B76C19F4E937.jpg
    45DB8994-9BBC-463B-8A9B-09A348DF5740.jpg
    B04F193B-F9CA-46B8-8096-7DE3492241C3.jpg
    73F0E4FC-3950-41CC-8E08-C2213E540202.jpg
     
  5. Nov 16, 2022 at 1:53 PM
    #5
    snapspinner

    snapspinner [OP] Well-Known Member

    Joined:
    Feb 24, 2018
    Member:
    #245432
    Messages:
    616
    Gender:
    Male
    First Name:
    Shawn
    Vehicle:
    2023 TRD OD DCSB Electric Lime
    It does look good in the pictures. The bed liner/ matt black paint is my back up plan if my attempt to color match the truck doesn't work out. I'm not going to be too picky on how it looks since the cap is mostly windows anyway, it won't show small flaws like a body panel would. I guess the top might look bad, but you really can't see that when it's on the truck.
     
  6. Nov 16, 2022 at 1:54 PM
    #6
    dmurph1996

    dmurph1996 Beer me

    Joined:
    Apr 11, 2018
    Member:
    #250200
    Messages:
    3,537
    Gender:
    Male
    First Name:
    murph
    Arvada, CO
    Vehicle:
    2018 Tacoma TRD Offroad
    Subbed, could be good down the road
     
    six5crèéd likes this.
  7. Nov 16, 2022 at 1:55 PM
    #7
    snapspinner

    snapspinner [OP] Well-Known Member

    Joined:
    Feb 24, 2018
    Member:
    #245432
    Messages:
    616
    Gender:
    Male
    First Name:
    Shawn
    Vehicle:
    2023 TRD OD DCSB Electric Lime
    I'll post pictures of the successes and the failures for your entertainment :)
     
  8. Nov 16, 2022 at 2:06 PM
    #8
    dmurph1996

    dmurph1996 Beer me

    Joined:
    Apr 11, 2018
    Member:
    #250200
    Messages:
    3,537
    Gender:
    Male
    First Name:
    murph
    Arvada, CO
    Vehicle:
    2018 Tacoma TRD Offroad
    ahhh you're too kind! Cheers!
     
  9. Nov 16, 2022 at 2:08 PM
    #9
    PlataTaco

    PlataTaco Well-Known Member

    Joined:
    Jun 18, 2022
    Member:
    #399683
    Messages:
    67
    Gender:
    Male
    First Name:
    Cole
    SoCal - Coachella Valley
    Vehicle:
    Silver 2015 DCSB Limited
    I did mine in bedliner too using a kit from Custom Coat (same people that make Raptor Liner). I'd offer mostly the same input as what's been said; hardware/windows really aren't that much trouble to take off for painting, at least the rear seal should be replaced, and most of the work is in sanding and repairing any chips, cracks, or holes. I did also mask off a small border around the window openings so the windows would still seal properly and also where the logos and brake light attach but if you're not using a textured paint that wouldn't be necessary.Screenshot_20221116-160645_Gallery.jpg
    Screenshot_20221116-160713_Gallery.jpg
     
    Ngneer, Brex69, six5crèéd and 3 others like this.
  10. Nov 17, 2022 at 10:19 AM
    #10
    dmurph1996

    dmurph1996 Beer me

    Joined:
    Apr 11, 2018
    Member:
    #250200
    Messages:
    3,537
    Gender:
    Male
    First Name:
    murph
    Arvada, CO
    Vehicle:
    2018 Tacoma TRD Offroad
    that's badass
     
    Ngneer and PlataTaco[QUOTED] like this.
  11. Nov 21, 2022 at 12:32 AM
    #11
    TacoJay808

    TacoJay808 Well-Known Member

    Joined:
    Oct 7, 2020
    Member:
    #343095
    Messages:
    55
    Gender:
    Male
    First Name:
    James
    Washington State
    Vehicle:
    2022 Tacoma TRD Off Road DCSB
    Awesome job! Thinking about doing the same with my canopy. Shop quoted me $3100 for a camper in excellent condition.
     
    Ngneer and PlataTaco[QUOTED] like this.
  12. Nov 22, 2022 at 10:52 AM
    #12
    snapspinner

    snapspinner [OP] Well-Known Member

    Joined:
    Feb 24, 2018
    Member:
    #245432
    Messages:
    616
    Gender:
    Male
    First Name:
    Shawn
    Vehicle:
    2023 TRD OD DCSB Electric Lime
    Allright, work begins on the paint job. But first, a little background. We had originally planned to buy a 4runner when it came time for a new vehicle and keep the Taco as a backup for camping/travelling. Well, we went and test drove a 4Runner and after that drive my wife decided that she liked the Tacoma's better. Who am I to argue? So we decided to get a TRD offroad Taco instead. Since we don't really need 2 tacos we are going to move everything over from the old one to the new one.


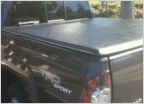
    Anyway, this is the shell I'm going to paint as it sits on our 2016 Sport.


    And the reason for the paint job.


    Hopefully it won't end up looking like this.
     
    Ngneer likes this.
  13. Nov 22, 2022 at 10:57 AM
    #13
    snapspinner

    snapspinner [OP] Well-Known Member

    Joined:
    Feb 24, 2018
    Member:
    #245432
    Messages:
    616
    Gender:
    Male
    First Name:
    Shawn
    Vehicle:
    2023 TRD OD DCSB Electric Lime
    First step. Remove patches.


    And build a stand to hold it while I sand it and paint it. I put casters on it so I can move it around as needed. I plan to strap the cap onto it to keep it in place. I had to buy five 2x4s for this but the plywood I had laying around.

     
    Last edited: Nov 22, 2022
    MGMDesertTaco likes this.
  14. Nov 22, 2022 at 11:02 AM
    #14
    snapspinner

    snapspinner [OP] Well-Known Member

    Joined:
    Feb 24, 2018
    Member:
    #245432
    Messages:
    616
    Gender:
    Male
    First Name:
    Shawn
    Vehicle:
    2023 TRD OD DCSB Electric Lime
    Based on advice from you guys, I decided to pull all the windows. Not too bad of a job. It took about an hour because I was going slowly and bagging and tagging all the hardware so I can put it back together when I'm finished. The windows came out by removing the inner trim ring (that's held on by about 20 screws) and then gently prying them outwards until the sealant releases.


    TacoJay808 and dmurph1996 like this.
  15. Nov 23, 2022 at 12:29 AM
    #15
    TacoJay808

    TacoJay808 Well-Known Member

    Joined:
    Oct 7, 2020
    Member:
    #343095
    Messages:
    55
    Gender:
    Male
    First Name:
    James
    Washington State
    Vehicle:
    2022 Tacoma TRD Off Road DCSB
    Awesome. Looking forward to the updates!
     
  16. Nov 23, 2022 at 11:48 PM
    #16
    erok81

    erok81 Well-Known Member

    Joined:
    Aug 15, 2016
    Member:
    #194699
    Messages:
    5,708
    Gender:
    Male
    Vehicle:
    Imposter
    You don’t happen to still have the shell off the truck do you? If you do I’d really appreciate if you could take a couple measurements for me.
     
  17. Nov 24, 2022 at 7:31 AM
    #17
    snapspinner

    snapspinner [OP] Well-Known Member

    Joined:
    Feb 24, 2018
    Member:
    #245432
    Messages:
    616
    Gender:
    Male
    First Name:
    Shawn
    Vehicle:
    2023 TRD OD DCSB Electric Lime
    It's actually still on the truck. I'm going to make our Thanksgiving guests help me take it off. Work before food. :):hungry::hungry:

    What measurements do you need? I'll try to get them for you over the next few days.
     
    erok81[QUOTED] likes this.
  18. Nov 26, 2022 at 8:48 PM
    #18
    erok81

    erok81 Well-Known Member

    Joined:
    Aug 15, 2016
    Member:
    #194699
    Messages:
    5,708
    Gender:
    Male
    Vehicle:
    Imposter
    Good call. Haha.

    Hope I’m not too late. Here’s what I need if you can. The shell sits on the bedcaps so it’s going to have a recess where the bedcaps fit into. I’d describe as a flattened upside down U. I’ve tried to find pics but I can’t.

    I have to build a custom rail for mine to sit on but I have no idea how deep or wide that channel thing is. I also can’t get any manufacturers to tell me either.

    If that doesn’t make sense I’ll try to draw a pic.
     
  19. Dec 4, 2022 at 5:19 PM
    #19
    snapspinner

    snapspinner [OP] Well-Known Member

    Joined:
    Feb 24, 2018
    Member:
    #245432
    Messages:
    616
    Gender:
    Male
    First Name:
    Shawn
    Vehicle:
    2023 TRD OD DCSB Electric Lime
    Dove in on the deep end today. Pulled the rear seal and brake light. Then we started sanding, so I'm fully committed now. It actually took almost as much time to get the old sealant off from around all the openings as it did to sand the whole thing. Also, the rear seal was riveted on in 4 places, so that added to the removal time quite a bit. Thanks Leer :)

    Sanding is fun


    Pretty much sanded


    After a wash and moving it back into the garage, I can see a few shiny spots that I need to hit again.
     
    TacoZmtn likes this.
  20. Dec 6, 2022 at 7:48 PM
    #20
    snapspinner

    snapspinner [OP] Well-Known Member

    Joined:
    Feb 24, 2018
    Member:
    #245432
    Messages:
    616
    Gender:
    Male
    First Name:
    Shawn
    Vehicle:
    2023 TRD OD DCSB Electric Lime
    Here is todays update. I sanded some more to get the shiny spots scuffed up. Then I started masking things off and made the first mistake of this project. Well maybe not the first mistake but the biggest so far. :) I had these black plastic sheets laying around, so I wanted to use them to protect the inside of the shell from overspray. Well guess what doesn't stick to the plastic? Masking tape. No problem I thought, I'll use the masking tape to define the edges and then I'll use duct tape to hold the plastic to the masking tape. Remember the duct tape, it will come back to haunt the project in a minute.

    So anyway, I got everything masked off, and the surface cleaned and ready to paint. Then I sprayed the primer.


    Well remember the duct tape? Well guess what doesn't stick to duct tape? Paint. After it dried I noticed the paint was flaking off of the tape everywhere. I was really afraid if I didn't get it all off flakes would end up in the color coat.


    I tried brushing it and gently blowing it with air but I'd still find more flakes.


    I the end I decided the best thing to do was to leave the plastic in place to protect the inside and mask over it cover all the duct tape. This time I used paper instead. This isn't the end of the world, but it did add about an hour and a half of work to the project.


    Over all, I'm pretty happy with the finish of the primer and it seems to be adhering well. The project is on hold for a few days because rain has settled in.
     
    texvet61 and MGMDesertTaco like this.

Products Discussed in

To Top