1. Welcome to Tacoma World!

    You are currently viewing as a guest! To get full-access, you need to register for a FREE account.

    As a registered member, you’ll be able to:
    • Participate in all Tacoma discussion topics
    • Communicate privately with other Tacoma owners from around the world
    • Post your own photos in our Members Gallery
    • Access all special features of the site
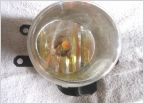
New SnugTop and a Camping Platform Build (Access Cab)

Discussion in '3rd Gen. Tacomas (2016-2023)' started by Sport2018, Apr 20, 2018.

  1. Apr 20, 2018 at 6:00 PM
    #1
    Sport2018

    Sport2018 [OP] Active Member

    Joined:
    Mar 15, 2018
    Member:
    #247415
    Messages:
    43
    Gender:
    Male
    First Name:
    Brandon
    Vehicle:
    2018 Tacoma Sport v6 4x4 Access Cab - 6 Speed Manual
    Fab Four rear bumper, $160 Chinese Grill (Black), TRD Skid Plate, 265/70/17 BF KO2 C's
    I wanted to post the kind of pictures i was looking for everywhere a couple months ago when deciding on a cap and what to do with it. To all those that posted pics a big thank you for helping me decide, and the inspiration and ideas to build a platform in the bed of my truck.

    I got the SnugTop Rebel with fold-down front slider, pet screens, free pro lock upgrade, and fishing rod holders. Also the Yakima tracks SnugTop installed and then bought the Yakima setup with corebars on install day from the dealer and installed those at home. The dealer was the best price in Az, did a fine install and was a pleasure to deal with (all just under 3k):
    Driven Auto Accessories in Prescott, Az. Merle Ross (844) DRIVEN1

    This was a fly by the seat of my pants build. Only plan i had was I wanted it very stout and to be modular so i can take it all out myself, and i in no way was going to drill holes or modify my truck (truck has less than 3k miles). I built as i went, with ideas flooding in my head at night, with some inspiration from utube vids and google pics that i would pick ideas from. I'd write them down and incorporate it the next day. To God be all the glory but it certainly helped to have all the right tools, a good work table, and some carpentry background.

    I used all screws and tried to maximize storage space as much as i could and I used the reflective insulation to line all sides in the compartments (see if it helps) and used some cut out foam insulation in a few other places. It's not cold proof but might help.
    The whole thing is secure by gravity and tight, not too tight!, cuts. I gave an 1/8 on the length of everything (and good thing too because when i secured everything in after screwing in the plywood tops i lost that 1/8th, and am perfectly flush with the tailgate when closed) and a 1/16th all around the plywood top.

    It is 3 sections and all built like a brick shithouse:

    The passenger side has skinny storage next to the wheel well with an accessible from inside small storage space directly behind the cab. It also holds my electronics towards the tailgate. This is my secure side when sitting in the middle, to be used as a table and will be dog free!
    The middle is a slideout in two sections, the smaller being separate to account for the difference in length when the slider is in 'down' position. The difference is in account of the 45 degree 2x4s being used as a recline for the back support when in 'down' mode. That is framed together solid and is what mainly pins the two main sections in (the other being the slider). Its not screwed to anything and with a little shimmying pops in and out allowing for the two big sections to easily be removed.
    The drivers side is the heaviest and has about a foot wide corridor running the length of the truck with a slide out drawer that comes out level with the end of the tailgate, and storage with trap door access behind that running to the cab. The drivers side furthest allows a 1-2 inch gap to the wheel well running about 5 foot back, allowing storage for tent poles or even an axe. With the bubble insulation and a tight fit it's secure. There is also a trap door small enough for my hand to access a small space at the corner of the bed behind the axe handle.

    It's got two golf cart batteries totaling 50ah run in parallel. They have two quick disconnect attachments hardwired to the batteries that i can plug trickle charger (pluged into outlet in back of truck) or a solar controller for a 70w 'suitcase' panel. One is dedicated to a computer fan wired through a switch, a 3 12v cig outlet box, and a small digital battery monitor display all funneling into the smaller gauge of the two quick disconnects.

    The side rail storage with MOLLE and ALICE bags was a just 3 days ago idea. I bought a long time ago little metal fittings that slide into the Toyota bed rails that you can screw a bolt through ( on Amazon). I figured i could use that as a fixed point to frame shelves maybe, but i have two dogs who'll always be with me (one is around 80-90lbs) so i needed max bed space. I had previously drilled through some steel strips from HD and it's about 1 1/2 wide... perfect to strap hold ALLL the MOLLE and ALICE gear i have accumulated over the years for outdoors stuff. It's a perfect fit, works great, keeps everything secure and takes care of everything from matches to rolled up pants. It really, really worked out perfectly.

    I also want to mention how absolutely useful the hook side of velcro is. I can secure all kinds of stuff to not only the cap liner, but the carpet. I also am anticipating the usefulness of magnets. I drilled steel strips where i could, even velcro'd a small strip :) for a magnet hook, and i have steel crossbars and rear bumper. Those with a steel workbench should appreciate the usefulness of magnets.

    Well i do hope to at least inspire some ideas for others looking to build a camping/sleeping platform, and to those considering a SnugTop here are a few pics on an access cab of the SnugTop Rebel.

    I do have more pics of the building process and may post them at another time if anybody is interested. If you have any questions, ask away. Thanks for looking!
    5-18 221.jpg 5-18 223.jpg 5-18 226.jpg 5-18 227.jpg 5-18 225.jpg 5-18 204.jpg 5-18 187.jpg
     
    Last edited: Apr 20, 2018
  2. Apr 21, 2018 at 12:37 PM
    #2
    Blether

    Blether Well-Known Member

    Joined:
    Aug 27, 2017
    Member:
    #228165
    Messages:
    46
    Vehicle:
    2014 Tacoma TRD DC
    Looks great - good job!
     
  3. Apr 21, 2018 at 3:44 PM
    #3
    Sport2018

    Sport2018 [OP] Active Member

    Joined:
    Mar 15, 2018
    Member:
    #247415
    Messages:
    43
    Gender:
    Male
    First Name:
    Brandon
    Vehicle:
    2018 Tacoma Sport v6 4x4 Access Cab - 6 Speed Manual
    Fab Four rear bumper, $160 Chinese Grill (Black), TRD Skid Plate, 265/70/17 BF KO2 C's
    :) Thanks.
     
  4. Apr 21, 2018 at 3:51 PM
    #4
    Steves104x4

    Steves104x4 Well-Known Member

    Joined:
    Apr 17, 2010
    Member:
    #35468
    Messages:
    17,046
    Gender:
    Male
    First Name:
    Steve
    Buffalo NY
    Vehicle:
    2010 RC 2.7 4x4
    BUCKLE UP! It makes it harder for Aliens to pull you out of your Truck.
    Well done, old boy. Well done!
     
  5. Apr 24, 2018 at 9:04 AM
    #5
    bmgreene

    bmgreene Well-Known Member

    Joined:
    Nov 18, 2009
    Member:
    #26145
    Messages:
    2,844
    Gender:
    Male
    First Name:
    Brian
    L.A. Westside
    Vehicle:
    2010 PreRunner V6 SR5/OR
    Alcan Leaf Packs, OME884 Coils, 5100 shocks, U.S. Offroad Winch Mount w/Winch, Trail Gear Rear H/C Bumper, Prinsu Cabrack, DIY custom in-bed storage/sleeping deck, Sway bar delete, hidden "snorkel" intake mod, In-dash CB, Bestop Supertop, Undercover Swingbox, hood lifters, assorted lights and front spotting camera
    Nice work. I'm finally in the process of doing something along this line, with a little different configuration. I'm usually prone to overbuilding things myself (I might have the world's only pair of solid cherry 12" speaker stands), but plan to go a little lighter on this to make it something that can come out if needed and to maximize the storage space under the deck.

    Two quick (and hopefully simple questions):
    What's the height of the wheel wells above the bed deck?
    How'd you anchor that down to the bed, or is it just using gravity? I'm a bit worried about stuff bouncing around when taking bumps at moderate speeds.
     
  6. Apr 24, 2018 at 9:30 AM
    #6
    vuTron

    vuTron Well-Known Member

    Joined:
    Sep 9, 2015
    Member:
    #163855
    Messages:
    1,119
    Gender:
    Male
    SF Bay Area
    Vehicle:
    2016 Quicksand TRD O/R DCSB AT
    nice work!
     
  7. Apr 24, 2018 at 9:05 PM
    #7
    Sport2018

    Sport2018 [OP] Active Member

    Joined:
    Mar 15, 2018
    Member:
    #247415
    Messages:
    43
    Gender:
    Male
    First Name:
    Brandon
    Vehicle:
    2018 Tacoma Sport v6 4x4 Access Cab - 6 Speed Manual
    Fab Four rear bumper, $160 Chinese Grill (Black), TRD Skid Plate, 265/70/17 BF KO2 C's
    Hi bmgreene, and thank you all :)

    Yeah stoutness lasts and i didnt want any wobbling or give, i also had to consider the modular design taking it in and out. It'll be banged, dropped, etc and this'll take a 1-2 foot drop without noticing. I could have made a better, lighter drawer tho, and probably will in the future. I also wanted to have the option of putting very heavy stuff, non camping related, if i had to on top.

    I dont know the height i never had to deal with it directly, if i understand your question correctly. I worked initially solely off the 2 side x side "2x4"s that fit into the bed slots (7" wide) and the 1x2s along the bed. I do remember the difference in height, which caused some adjustment, of the top of the wheel well to the top of the "2x4"s being 5/8ths, if i remember correctly.

    I have the option to anchor the whole thing if i want, having left access to the 4 tie points in the bed. But i feel the weight of the material and the tight fit will hold it in place well. I also plan on storing my cooler on top of the slider in 'down' position at the tailgate which will give weight to the back.

    If you're worried about your gear rattling around, i actually did cut some nice cushioning matting that i was going to place in all the bays but scrapped that to try the bubble insulation, which in itself provides padding. So do something like that, in drawers and bays with bungee securing whatever down on the pads.
    These are things ill find out in time and will probably post updates of lessons learned, as this thing still needs a shake-down cruise. But i have no intention of banging this thing around at speed, Ill have too much stuff, and my two dogs in the back!
     
  8. Apr 24, 2018 at 10:32 PM
    #8
    bmgreene

    bmgreene Well-Known Member

    Joined:
    Nov 18, 2009
    Member:
    #26145
    Messages:
    2,844
    Gender:
    Male
    First Name:
    Brian
    L.A. Westside
    Vehicle:
    2010 PreRunner V6 SR5/OR
    Alcan Leaf Packs, OME884 Coils, 5100 shocks, U.S. Offroad Winch Mount w/Winch, Trail Gear Rear H/C Bumper, Prinsu Cabrack, DIY custom in-bed storage/sleeping deck, Sway bar delete, hidden "snorkel" intake mod, In-dash CB, Bestop Supertop, Undercover Swingbox, hood lifters, assorted lights and front spotting camera
    I'm trying to work around keeping my swingbox installed on the driver side and my hilift mounted on the pass side mostly above the wheel well, plus incorporating some cradles for strapping in a 20lb propane tank for camping/tailgating. the only really heavy things that'll be put on top of the unit are going to be stacks of sheet goods (when I get to replacing my kitchen cabinets) or other lumber and my own fat ass when I'm feeling too lazy to deal with a tent for camping. the stuff on the sides is blocking the cross-beam notches on at least one side so I'm trying to get the carcase deck even with the wheel wells although having extended sides resting on the well tops will also work for me.

    For one of the drawers, I've built a folding table/box for cooking or other gear, and pull-out cargo drawer that'll probably primarily hold a tool bag and some other recovery gear most of the time. my current plan is to use some strips of e-track to arrange for flexible retention options inside both of those with either nylon webbing or ratchet straps. I'm thinking I might be able to do some attachment into the bed with some e-track single brakets, but might also look into bolting the base plate into rivnuts set in the bed (but I'm worried about the inserts corroding quickly due to contact with the composite bed).

    As far as the housing structure, I've got a sheet of 1/2" sande ply to cut the base plate from and plan to use 1/2" birch ply for the deck with 3/4" sande or hardwood ply making up the vertical elements built up with a combination of pocket joinery and deckers run through the flats plus outdoor glue (I might dowel the upper/lower joints for better strength though). It'll be plenty strong without all the weight of 2x4 framing which is why I'm more concerned with it getting bounced around. I'll get some pics up once it's actually coming together
     
  9. Apr 25, 2018 at 1:00 AM
    #9
    motor-vater

    motor-vater Well-Known Member

    Joined:
    Feb 19, 2017
    Member:
    #211047
    Messages:
    77
    Gender:
    Male
    Nice rig! Nice work...
     
  10. Apr 25, 2018 at 7:49 PM
    #10
    Sport2018

    Sport2018 [OP] Active Member

    Joined:
    Mar 15, 2018
    Member:
    #247415
    Messages:
    43
    Gender:
    Male
    First Name:
    Brandon
    Vehicle:
    2018 Tacoma Sport v6 4x4 Access Cab - 6 Speed Manual
    Fab Four rear bumper, $160 Chinese Grill (Black), TRD Skid Plate, 265/70/17 BF KO2 C's
    Sounds great man! Look forward to seeing a pic. ..and thx vater ;)


  11. Apr 27, 2018 at 2:43 PM
    #11
    Sport2018

    Sport2018 [OP] Active Member

    Joined:
    Mar 15, 2018
    Member:
    #247415
    Messages:
    43
    Gender:
    Male
    First Name:
    Brandon
    Vehicle:
    2018 Tacoma Sport v6 4x4 Access Cab - 6 Speed Manual
    Fab Four rear bumper, $160 Chinese Grill (Black), TRD Skid Plate, 265/70/17 BF KO2 C's
    I had 2" leafs installed on the rear, to compensate for the weight of bed platform and planned Megawarrior roof rack, ARB 2500 awning, and Road Shower weight. I will also pull a trailer with sidexside on occasion. I can say as it is now it drives wonderfully, and perfectly stiffened the bit of sag i could feel driving. I took it out on a pretty rocky road and it did better than expected, same with everything staying put in the bed.

    I have searched for options on many of the things i have done and plan to do, with the equipment i have, and it's been tedious to say the least because it's spread out and outdated. So im going to update here every once and a while showing how it all was put together. Hopefully to the benefit of someone with similar ideas and vehicle.

    Here is a pic with leafs installed. (same weight in bed as pic above)

    IMG_20180426_173410772.jpg
     
  12. Apr 27, 2018 at 2:48 PM
    #12
    ManInTheMaze

    ManInTheMaze Well-Known Member

    Joined:
    Jun 13, 2017
    Member:
    #221467
    Messages:
    827
    Gender:
    Male
    First Name:
    Matt
    Mendo
    Vehicle:
    2003 and 2017
    What leaf pack did you go with?
     
  13. Apr 27, 2018 at 2:50 PM
    #13
    jwctaco

    jwctaco Retired, going slow in the fast lane

    Joined:
    Sep 5, 2015
    Member:
    #163478
    Messages:
    9,901
    Gender:
    Male
    First Name:
    Jim
    SW Michigan
    Vehicle:
    23’ T4R
    Very nice
     
  14. Apr 27, 2018 at 7:44 PM
    #14
    Sport2018

    Sport2018 [OP] Active Member

    Joined:
    Mar 15, 2018
    Member:
    #247415
    Messages:
    43
    Gender:
    Male
    First Name:
    Brandon
    Vehicle:
    2018 Tacoma Sport v6 4x4 Access Cab - 6 Speed Manual
    Fab Four rear bumper, $160 Chinese Grill (Black), TRD Skid Plate, 265/70/17 BF KO2 C's
    Tuff Country 85250.

    I know nothing about the company, i got them because they were available from 4Wheel Parts, which has local storefronts and is where i got my rear bumper and ARB awning. Some websites will mislead you suggesting another part or it doesnt fit, 4Wheel and Tuff Country confirmed... and they obviously work.

    BTW, I had Big-O, of all places, install them they charged 160.
     
    ManInTheMaze likes this.
  15. May 3, 2018 at 4:04 PM
    #15
    Sport2018

    Sport2018 [OP] Active Member

    Joined:
    Mar 15, 2018
    Member:
    #247415
    Messages:
    43
    Gender:
    Male
    First Name:
    Brandon
    Vehicle:
    2018 Tacoma Sport v6 4x4 Access Cab - 6 Speed Manual
    Fab Four rear bumper, $160 Chinese Grill (Black), TRD Skid Plate, 265/70/17 BF KO2 C's
    Mounted ARB 2500, Yakima MegaWarrior, and RoadShower today, here are some pics...

    Concerning how i mounted the ARB, well it's overkill i know (and i decided against drilling just because i'd rather not drill my new bars, but happily would have if no other options). But, i could only find a 3(and an 1/8) inch wide U-bolt that is three inches long in 7/16ths. I would have preferred 3/8ths. For these Yakima crossbars a min of 3 inches inside width is needed, and longer than 3 inches the thread doesnt come up high enough. Another thing was the U-bolts didnt come with the metal bottom bars, so i had to cut, drill and rustoli em.. with a plastidip coat for good measure. It was tricky getting the ARB universal brackets in the perfect spot as these crossbars don't have hardly any flat surface. But they dont move at all, and if you pull down on the awning the crossbars flex immediately. I also put a little baseplate under the brackets to clear the crossbar endcaps, which made it even more tricky tightening on that flat sweet spot. Also, ARB recommends you not extend either end past a crossbar more than 2 feet, so 4 foot spread on the crossbars. If you do not have a full bed and are not able to get the longest tracks on your cap, you'll not have enough spread and need to choose the 2000, or put a crossbar over your cab.
    Gonna test is all out this weekend.

    I also did some pretty rocky trails today, rocky enough i was in 4low, and the adding the leafs was brilliant. If you've got some sag in the rear, add a leaf is just what the doctor ordered. I'm so pleased and impressed.


    IMG_20180503_144345433.jpg IMG_20180503_144354886.jpg IMG_20180503_144411136.jpg IMG_20180503_144433638.jpg IMG_20180503_144439016.jpg
     
    Last edited: May 3, 2018
    TacoManOne likes this.
  16. May 3, 2018 at 4:18 PM
    #16
    Sport2018

    Sport2018 [OP] Active Member

    Joined:
    Mar 15, 2018
    Member:
    #247415
    Messages:
    43
    Gender:
    Male
    First Name:
    Brandon
    Vehicle:
    2018 Tacoma Sport v6 4x4 Access Cab - 6 Speed Manual
    Fab Four rear bumper, $160 Chinese Grill (Black), TRD Skid Plate, 265/70/17 BF KO2 C's
    ...and why not, a little guy chasing after mama

    IMG_20180503_111035401.jpg
     
  17. May 5, 2018 at 10:11 PM
    #17
    bmgreene

    bmgreene Well-Known Member

    Joined:
    Nov 18, 2009
    Member:
    #26145
    Messages:
    2,844
    Gender:
    Male
    First Name:
    Brian
    L.A. Westside
    Vehicle:
    2010 PreRunner V6 SR5/OR
    Alcan Leaf Packs, OME884 Coils, 5100 shocks, U.S. Offroad Winch Mount w/Winch, Trail Gear Rear H/C Bumper, Prinsu Cabrack, DIY custom in-bed storage/sleeping deck, Sway bar delete, hidden "snorkel" intake mod, In-dash CB, Bestop Supertop, Undercover Swingbox, hood lifters, assorted lights and front spotting camera
    Here's pics of my platform structure in construction and a box/table that will fill one of the bays. The cutout area is to.make clearance for the swingbox.


    20180505_220609.jpg 20180505_220712.jpg 20180505_220756.jpg

    20180505_152410.jpg
     
  18. May 6, 2018 at 11:49 AM
    #18
    Dor

    Dor Well-Known Member

    Joined:
    Apr 21, 2018
    Member:
    #251278
    Messages:
    352
    Gender:
    Male
    First Name:
    James
    Vehicle:
    '18 MB ACLB TRD-OR
    Thanks for posting this - just found the thread and am looking to do something similar in the back of an ACLB with a Snugtop Sport Hiliner. Would definitely be interested in more build pics or specs if you have 'em.
     
  19. May 6, 2018 at 3:10 PM
    #19
    bmgreene

    bmgreene Well-Known Member

    Joined:
    Nov 18, 2009
    Member:
    #26145
    Messages:
    2,844
    Gender:
    Male
    First Name:
    Brian
    L.A. Westside
    Vehicle:
    2010 PreRunner V6 SR5/OR
    Alcan Leaf Packs, OME884 Coils, 5100 shocks, U.S. Offroad Winch Mount w/Winch, Trail Gear Rear H/C Bumper, Prinsu Cabrack, DIY custom in-bed storage/sleeping deck, Sway bar delete, hidden "snorkel" intake mod, In-dash CB, Bestop Supertop, Undercover Swingbox, hood lifters, assorted lights and front spotting camera
    The main dimensions for the long bed (2nd gen) are these:

    Wheel wells are a bit over 42 in. between,
    Space from the front edge to the front corner of the wells is 13 in at the edges and 17 at the inside.

    I'm building mine overall 64" long to keep the inverter clear and leave room for stowing water bricks or other gear. if you don't need or want that, 73 inches should probably fit.

    The height of the vertical members in mine is a bit shy of 8 5/8 in, but that's based on using a 1/2 ply base plate to get just above/ even to the wheel wells.
     
  20. May 6, 2018 at 5:45 PM
    #20
    Dor

    Dor Well-Known Member

    Joined:
    Apr 21, 2018
    Member:
    #251278
    Messages:
    352
    Gender:
    Male
    First Name:
    James
    Vehicle:
    '18 MB ACLB TRD-OR

Products Discussed in

To Top