1. Welcome to Tacoma World!

    You are currently viewing as a guest! To get full-access, you need to register for a FREE account.

    As a registered member, you’ll be able to:
    • Participate in all Tacoma discussion topics
    • Communicate privately with other Tacoma owners from around the world
    • Post your own photos in our Members Gallery
    • Access all special features of the site

NEW PRINSU CROSSBARS - HELP!

Discussion in 'PrInSu Design Studio' started by GJN1, Mar 26, 2024.

  1. Mar 26, 2024 at 12:41 PM
    #1
    GJN1

    GJN1 [OP] Member

    Joined:
    Mar 2, 2024
    Member:
    #445081
    Messages:
    21
    Gender:
    Male
    First Name:
    GJ
    Hey everyone!

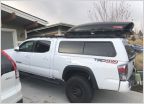
    I received the Prinsu Universal Topper Rack (5') recently. Long story short (and spare me the ridicule!) the rack they show on their site, as well as the rack they explain how to install in their Installation Guide, have the first generation Prinsu crossbars, which are rectangular (in cross-section view) with bolt channels on all 4 sides. The crossbars the Topper Rack come with now, however, are the new generation Prinsu PRO crossbars, which are NOT rectangular in cross-section view, with bolt channels on 3 of the 4 sides, and the bottom is a smooth curved protruded bottom. When I called them after my error below, they said "oh yeah, we haven't updated our installation guide to reflect the new parts yet" (this should be on their site--even if what I did was stupid :rofl:). The impact of this new Pro crossbar vs. the first gen one is on the mounting feet...more to come on that.

    I unfortunately did not know they changed the crossbars from what is displayed in their product pictures, so when I followed the out-of-date Installation Guide, I was told to use the old mounting feet (not the new, small ones they snuck into the package without a label--see pic below, they looked liked accessory mounts to me, not mounting feet), and it was apparent to me that the *only* way I could mount the crossbars with the old mounting feet was to mount the bars smooth side up, as the guide told me to install the first gen topper mount feet (for me, the Leer mount feet) on the bolt channels, which were only present on one side.

    I then realized that I now have no way to bolt anything on the top side of the crossbars (since I mounted all of them the same way for uniformity--the curved smooth bottom actually stands taller than the flat opposite side, so it would have made for an uneven rack profile if I didn't).

    When I realized what was up, I called Prinsu and asked why the guide had me install the Pro bars upside down, and asked to be sent the first generation crossbars with bolt channels on both sides, at which point they said "we changed the mounting for the Pro bars with the additional L shaped mounts that came with your rack, but we haven't updated the installation guide yet". I guess my bad for not thinking outside of the box and understanding what the random extra L mounts were for, since they didn't appear in the guide and didn't look like mounting feet for the rack system (to me at least).

    Anyway, they explained that I need to mount the new L mounts on the side channels of the Pro crossbars, which allow the bar to be channel-up and smooth side down, but still get mounted to the topper, but their explanation wasn't great. I need to call them again, but I also wanted to ask this forum--Has anyone mounted these new crossbars to their topper? Do the L mounts attach to the cross bar and then directly to the topper (by eyeball, looks like it will leave the rack very close to the roof of the topper)? This way would be putting 100% of the rack's supported weight onto the bolts, whereas with feet mounted underneath the rails the weight seems to be better distributed into the bracket. Or does the L mount attach to the existing mounting feet (for me, those Leer mounting feet), and then mount to the side of crossbars?

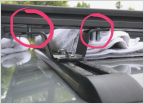
    Let me know if I'm not explaining this well enough. Pics attached of the new L Mount feet (loose) and the current Leer Mount feet (mounted)

    Cheers - GJ
    IMG_3749.jpg IMG_3750.jpg
     
  2. Mar 26, 2024 at 1:56 PM
    #2
    OldSchlPunk

    OldSchlPunk A legend in my own mind!

    Joined:
    Feb 13, 2022
    Member:
    #390091
    Messages:
    4,994
    Gender:
    Male
    First Name:
    Rich
    East Central Wisco
    Vehicle:
    '17 OffRoad Silver Sky Metallic
    Small lift, slightly oversized tires, well...
    Your pictures, while giving great detail, leave a person with no idea what we're looking at. Going to their website and looking at the pictures and their instructions, I have no idea how a person is supposed to use those "L" brackets for anything. Also, if I'm understanding your description of the crossbars, how would you attach the "stiffeners" to the bottom of the crossbars?
     
    MagicToolbox and GJN1[OP] like this.
  3. Mar 26, 2024 at 2:07 PM
    #3
    GJN1

    GJN1 [OP] Member

    Joined:
    Mar 2, 2024
    Member:
    #445081
    Messages:
    21
    Gender:
    Male
    First Name:
    GJ
    Right--According to Prinsu, stiffeners are not needed (the new Pro bars are engineered to be stronger).

    The pictures are the new L mounts (loose, uninstalled), as well as the current Leer mount feet (mounted to the inverted Pro crossbars).

    I'm pretty sure I came up with the solution--two L mounts get attached to the side channels of the crossbars, channel side up, smooth side down.
     
    four22 likes this.
  4. Mar 26, 2024 at 2:18 PM
    #4
    OldSchlPunk

    OldSchlPunk A legend in my own mind!

    Joined:
    Feb 13, 2022
    Member:
    #390091
    Messages:
    4,994
    Gender:
    Male
    First Name:
    Rich
    East Central Wisco
    Vehicle:
    '17 OffRoad Silver Sky Metallic
    Small lift, slightly oversized tires, well...
    I think I'm understanding what you're describing, but that sounds weaker than any other way they showed in their instructions. You're going from two mounting bolts on each leg to one.
     
  5. Mar 26, 2024 at 4:26 PM
    #5
    GJN1

    GJN1 [OP] Member

    Joined:
    Mar 2, 2024
    Member:
    #445081
    Messages:
    21
    Gender:
    Male
    First Name:
    GJ
    That's what I thought too--hence why I was unsure about the install. Though it isn't two down to one--with the L shaped brackets, you're supposed to mount one to each side of the cross bar, on both sides. So 4 total. The difference between these brackets and the mounting feet is that the bolts that connect the L shaped bracket to the side of the crossbar share a ton of the load, which is then distributed to the brackets, whereas the feet mounted underneath carried the load entirely and the bolts used to attach them to the crossbars did not.
     
  6. Apr 2, 2024 at 11:56 AM
    #6
    four22

    four22 Well-Known Member

    Joined:
    Dec 31, 2023
    Member:
    #440661
    Messages:
    53
    Gender:
    Male
    First Name:
    Ryan
    San Diego
    Vehicle:
    2020 TRD Off Road 4x4 Long bed
    This is good to know! Thanks for sharing your experience. My ARE CX Evolve topper will be installed this Friday and I too, will be ordering a Prinsu top rack that I will be installing myself. Can you post a pic of what it should look like with L brackets?
     
    GJN1[OP] likes this.

Products Discussed in

To Top