

-
Welcome to Tacoma World!
You are currently viewing as a guest! To get full-access, you need to register for a FREE account.
As a registered member, you’ll be able to:- Participate in all Tacoma discussion topics
- Communicate privately with other Tacoma owners from around the world
- Post your own photos in our Members Gallery
- Access all special features of the site
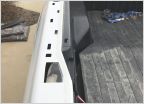 Did some camper waterproofing.
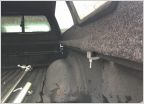 Leaking Leer Shell
 Tonneau Cover Gasket Help!!!
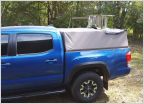 Custom soft topper out of canvas, pic and velcro
 Install Prep and Questions
 North mountain tonneau cover
How to: DIY Wedge Camper
Discussion in 'Tonneau Covers, Caps and Shells' started by Ripcord, Apr 15, 2019.
Page 91 of 182
Page 91 of 182
Products Discussed in


