

-
Welcome to Tacoma World!
You are currently viewing as a guest! To get full-access, you need to register for a FREE account.
As a registered member, you’ll be able to:- Participate in all Tacoma discussion topics
- Communicate privately with other Tacoma owners from around the world
- Post your own photos in our Members Gallery
- Access all special features of the site
 Spark gaps: FSM error?
 PDF template for splash guard / fender liner thingies
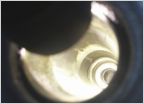 Stripped sparkplug "Help" 3.4l
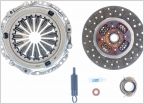 Opinions on best clutch kit for replacement
 Voltage to camshaft position sensor?
 What head unit are you running?
Does this look right?
Discussion in '1st Gen. Tacomas (1995-2004)' started by PrerunnerVsix, Dec 16, 2019.
Page 1 of 4
Page 1 of 4


