

-
Welcome to Tacoma World!
You are currently viewing as a guest! To get full-access, you need to register for a FREE account.
As a registered member, you’ll be able to:- Participate in all Tacoma discussion topics
- Communicate privately with other Tacoma owners from around the world
- Post your own photos in our Members Gallery
- Access all special features of the site
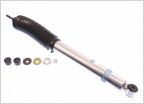 Cost of Bilstien 5100 Complete Install
 Airbag light and Passenger seatbelt light stay on
 Rear Sliding Window Latch, Just Glued?
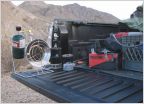 Vehicle Camping in Sierra Nevadas
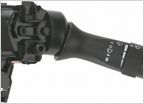 Change to Intermittent Wipers
 Aux fog light switches
DIY bed mat for less than $40
Discussion in '2nd Gen. Tacomas (2005-2015)' started by ssanders2211, Apr 25, 2014.


