

-
Welcome to Tacoma World!
You are currently viewing as a guest! To get full-access, you need to register for a FREE account.
As a registered member, you’ll be able to:- Participate in all Tacoma discussion topics
- Communicate privately with other Tacoma owners from around the world
- Post your own photos in our Members Gallery
- Access all special features of the site
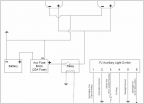 Lightforce Install (FJ Aux Switch Wiring)
 Parking light/ Turn Signal Bulb Help
 Has anyone tried 3157: ACME Switchback on a 1st gen 01-04?
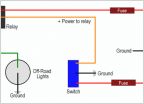 Offroad light oddity with a relay...
 RGB rock light instillation
Apollo 3.0 shrouds and inner LEDS
Discussion in 'Lighting' started by Aw9d, Sep 14, 2014.
Page 1 of 4
Page 1 of 4


