1. Welcome to Tacoma World!

    You are currently viewing as a guest! To get full-access, you need to register for a FREE account.

    As a registered member, you’ll be able to:
    • Participate in all Tacoma discussion topics
    • Communicate privately with other Tacoma owners from around the world
    • Post your own photos in our Members Gallery
    • Access all special features of the site

3rd Gen Strut, shock and AAL installation guide reference

Discussion in '3rd Gen. Tacomas (2016-2023)' started by KpeterDCLB, Feb 20, 2022.

  1. Feb 20, 2022 at 11:54 AM
    #1
    KpeterDCLB

    KpeterDCLB [OP] Member

    Joined:
    Oct 24, 2021
    Member:
    #380388
    Messages:
    8
    Gender:
    Male
    First Name:
    Kyle
    McKinney, TX
    Vehicle:
    TRD Sport DCLB
    Bully bar w/ LED Billsteins Cooper Adventurer AT’s
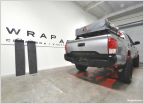
    Folks - yesterday I installed shocks, struts and an add a leaf in a ‘17 taco with Eibach Pro trucks in the front and bilstein 5100/icon AAL in the rear. After photo is at the bottom. Just want to give another thread option to folks searching for info so here’s my $.02 on the process. YouTube helped, but there’s some little details I hope we can provide to people that YouTube didn’t so they could keep their videos concise.

    Disclaimer! This is how I got the job done keeping myself safe and doing quality work, not an experts opinion. If you’re questioning your ability to do this safely please find an expert to help you hands on.

    Now then…

    Front: after you get the wheels off you’ll see an assembly with (not limited to) the sway bar, upper control arm (UCA), ball joint and some wiring brackets. First thing I did was remove the wiring brackets for the brakes. I believe it was a 10mm for upper and 12-14 for the lower.

    After that I disconnected the sway bar (17mm I believe) you want to make sure to do this on both sides so it can freely move. This isn’t a job that is best done 100% one side at a time. You can move that out of the way and start on the ball joint. When you take out the locking pin make sure you don’t damage it. It’s best to grab the outer side and pull laterally to disengage the grab hook instead of pulling straight out and twisting.

    Once you get that out loosen the nut so it drops 5-10mm down the threads. You do this so it stops the ball joint once you get the tension off of it. To release the ball joint - suck it up and smack it with a METAL hammer to shock it, heavier the better within reason. Your neighbors will be confused and you’ll look like an idiot to normal people but that’s the way to do it lol. Once it drops you can just remove the nut and it’ll separate.

    Once that’s done you can loosen the nuts on the top of the strut. Only take off the 3 nuts positioned trigonally NOT the center top nut. Remove the bolt in the bottom and maneuver it out.

    I installed Eibach Pro Truck shocks and used the OEM coil getting ~2 inches of lift. To replace the coil, use extremely caution if you do this at home. Not “I’ll wear safety glasses and get er done” type of caution but the kind where you know that if you get it wrong you could cause serious harm to health or property. I recommend finding a guy at a local shop to help. A kind neighbor of mine had his shop switch my coils for $40, same price as the spring clamps at harbor freight.

    To install the new struts simply backtrack all of your previous steps in reverse order and triple check that everything is tight.

    The most difficult part you’ll probably find is reconnecting the UCA and ball joint. My experience was - if you orient yourself facing the front of the truck, place your forearm and hand on the UCA and use the weight of your body and some pressure from your arm to press it back down through that knuckle and use your other hand to thread the nut back on a few turns. After that simply zip up that nut and replace the pin. Then attach the sway bar and wiring brackets back where they came from.

    I did not use aftermarket’s UCA’s but depending on your lift height you may find it necessary.

    NOTE: Be careful with the wiring brackets you removed at the beginning. When reinstalling mine I torqued it one last turn and completely split the bolt in half. I had to secure it afterward with a different method because of that.

    In the rear: I installed the Bilstein B8 5100 shocks and the Icon 1.5” Progressive AAL.

    Step 1 of what we did (use your judgement this is how I got it done, not an experts technical advice) Jack up the truck and place the Jack stands on the frame and hitch (3 stands), NOT the axle if you’re replacing the leafs. The axle will be unsupported once you start removing the leafs and the truck won’t be stable if you place the stands there.

    Then wheels and tires of course - and start removing the old shocks starting with the top nut followed by the lower bolt.

    I found that the top nut was seized and just made the shock rod spin freely. Bc of some QC at the assembly plant my bed was shifted left so on one side we couldn’t get the impact to it (or maybe the trucks are just like that!). We ended up using vise grips on the rod and we were able to get it off with some strategic pressure.

    Moving on to the AAL. The leaf springs have tension on them when the trucks weight is on them. What we did that worked and I’m sure isn’t the only method out there -

    Put the Jack under the rear diff and gave it a tiny bit of pressure just so it doesn’t fall fully - remember your jack stands are on the frame & hitch not the axle. First you’ll remove the parking brake line bracket from the leaf pack and remove the tension from the leafs by the lowering the Jack, then take off the u bolts.

    Once you do that you can remove the bolts on the ends of the leafs and get them out - they’re heavy! Best to have two people. Once removed, to install the AAL just remove the overload spring and put the rest over the center bolt of the new kit. One side of the AAL is longer than the other. I faced that towards the rear, if anyone knows differently please comment the correct orientation.

    We then tightened the center top securing nut and went to put it back in the truck. It’ll take some time to get the leafs back in the correct places, mess around with the Jack and tension to get the front and rear bolts lined up - a pry bar will be helpful here. Be careful not to lift the whole truck as well when lifting the axle. Use caution hammering the bolts in and mind the threads. After the front and rear are secure you should zip on the new U bolts then tighten the horizontal brackets with the included hardware from the kit. The impact hat cover will not fit the new center bolt so we drilled it out a little bit so it did.

    I did not have a place to secure the parking brake line on the new leafs, I will have to secure it with another means. If anyone has suggestions please reply!

    New rear shocks - these are a piece of cake to install relatively speaking. First I placed the lower side in the housing and just placed the bolt through. To get the top in you’ll have to apply some pressure to the shock. Use your body weight and it will slowly depress, it’d be very hard to shock it down, go slow.

    I did have the same issue with the locking nut where it just spun the whole rod because we couldn’t fit the impact and just used a wrench - even with all new hardware. It helped to use a pry bar to put just a little tension on the shock while turning it. We got to a point that didn’t work either and we were forced to use vise grips. I do not recommend doing that on a new shock but for my situation it seemed necessary. If you must do it because of the issue I described, try to grab it as high as possible on the rod since it is less likely to travel that far while driving. It ended up working for me and the rod was hard enough material that the vise grips didn’t leave a mark on it, but it is still not advisable to do this unless you must. Once the top nut is snugged up you can finish by zipping the nut on the bottom bolt. Again - triple check that everything you touched is tight before putting the wheels on and driving.

    for the test drive, take it nice and easy for a few miles and listen with the windows down. If you’re confident, find a place to get up to highway speed and feel and listen to the vehicle.

    If all is good there, go get yourself an alignment and enjoy your upgrade. After pic below!
    [​IMG]
     
    Dawghouse and Kindadinosaur like this.
  2. Feb 21, 2024 at 1:41 AM
    #2
    Chriswhaaaat

    Chriswhaaaat Well-Known Member

    Joined:
    Dec 3, 2023
    Member:
    #438741
    Messages:
    137
    Alberta, Canada
    Vehicle:
    2024 Tacoma Trailhunter, 2018 4runner, 1977 FJ45
    Hey Kpeter,

    good write up. I just did this replacement myself with the ICON AAL’s 1.5” kit and bilstein 5100’s all anround… and was looking for some others observations on torque specs. My kit has a note to torque the new u-bolt nuts to 90ft-lb but the factory spec is 54. 90 felt quite tight, but they were certainly bigger.

    I might add a couple notes about the install (for the AAL leafs).

    1) I recommend leaving the leafs installed in the truck. When you lower the axle, you can get enough room to remove the overload spring and insert the new leaf pack. You can avoid having to re-align the leafs this way, there is plenty of clearance If you lower the axle. Just watch the brake line on the driver’s side, don’t hang the axle from it.
    2) I found that I only had to cut out the rear leaf pack clip and was able to Leave the front ones since the longer side of the AAL goes to the rear.
    3) use some junky clamps to hold the leaf pack together as needed when maneuvering or tightening bolts
    4) id add some blue loctite to some of the nuts.
    5) the factory shocks, top nut, does have a small flat on the tip of the threaded end with which to grab with a wrench to help back the old nut off. Additional strategies if stuck can include some penetrating fluid, heat the nut itself, hit with a hammer (and a punch for precision) to shock it immediately after heating, then more fluid. As kpeter said, grab the rod with vice grips.
    6) give the leaf packs a few whacks with a hammer here and there as you tighten everything up to allow any shifting to work it’s way out (and of course re-check all after 100km or less).
    7) the new Center alignment bolt on the AAL should be cut rather than drilling out your bump stop.
    8) the AAL front clip can be a new spot for the parking brake line bracket. Get some sturdy pliers and bend the bracket around so it sits nicely against it.
    9) +2 to the grabbing the rod of new shocks with vice grips. Shouldn’t take much pressure and shouldn’t cause any issues If done up high.

    Best of luck!
     
    Last edited: Mar 4, 2024

Products Discussed in

To Top