

-
Welcome to Tacoma World!
You are currently viewing as a guest! To get full-access, you need to register for a FREE account.
As a registered member, you’ll be able to:- Participate in all Tacoma discussion topics
- Communicate privately with other Tacoma owners from around the world
- Post your own photos in our Members Gallery
- Access all special features of the site
 Alignment issues after suspension rebuild & tie rod replacement. Help!
 Idler pulley bearing.....
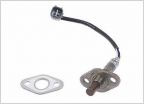 Denso o2 sensors for 99 tacoma 4x4 2.7
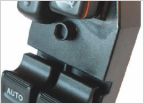 Is there anyway to convert both electric windows to auto?
 Jack and Jack Stand Weight Ratings
 CHIPPED CHROME...
2003 Tacoma DualShift Twin-Sticks Installation
Discussion in '1st Gen. Tacomas (1995-2004)' started by accountant_mechanic_, Mar 31, 2025.


