

-
Welcome to Tacoma World!
You are currently viewing as a guest! To get full-access, you need to register for a FREE account.
As a registered member, you’ll be able to:- Participate in all Tacoma discussion topics
- Communicate privately with other Tacoma owners from around the world
- Post your own photos in our Members Gallery
- Access all special features of the site
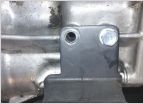 Stripped transmission mount hole. Need advice/ideas on how to fix
 Old hat, new truck. Dose anyone do build threads anymore?
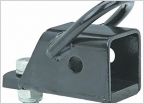 Converting a ball hitch to a 2" receiver
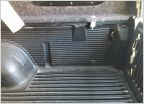 Drill into truck bed for sleeping platform support?
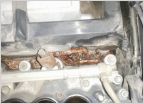 Weird Coolant Leak
2001 Taco: Tools (DIY) for replacing Upper & Lower Ball Joints
Discussion in '1st Gen. Tacomas (1995-2004)' started by srsupertrap, Jul 5, 2013.


